|
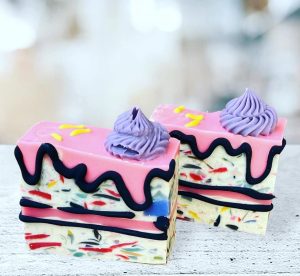
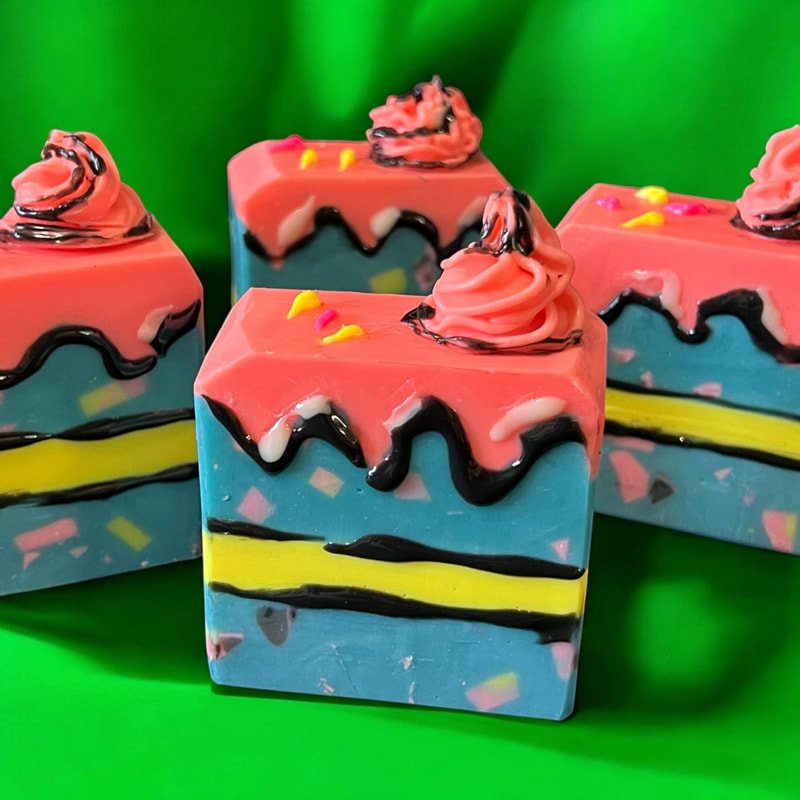
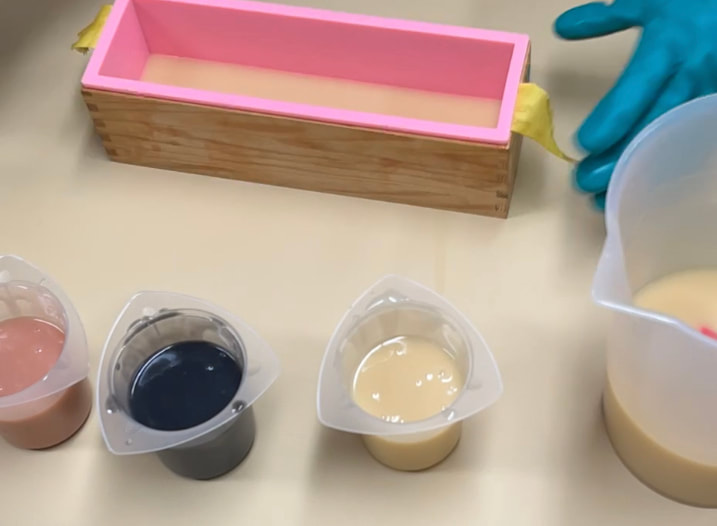
Cartoon cakes...I had never stepped into this world, until yesterday. Amy Warden's Soap Challenge Club is tackling this technique this month, so I thought I'd give it a try. This tutorial is taught by guest instructor Sara Golding of Sunny Girl Sundries and Sunny Girl Business Solutions. With fall just about here, I thought I would lean into the pumpkin spice theme for this challenge. Customers love the pumpkin spice scent this time of year, and I created my own this time using an essential oil blend of Cinnamon, Cardamon, Ginger, Clove & Nutmeg. Here are pictures of the Cartoon Cake Soaps made for the tutorial, and the inspiration to get us started.
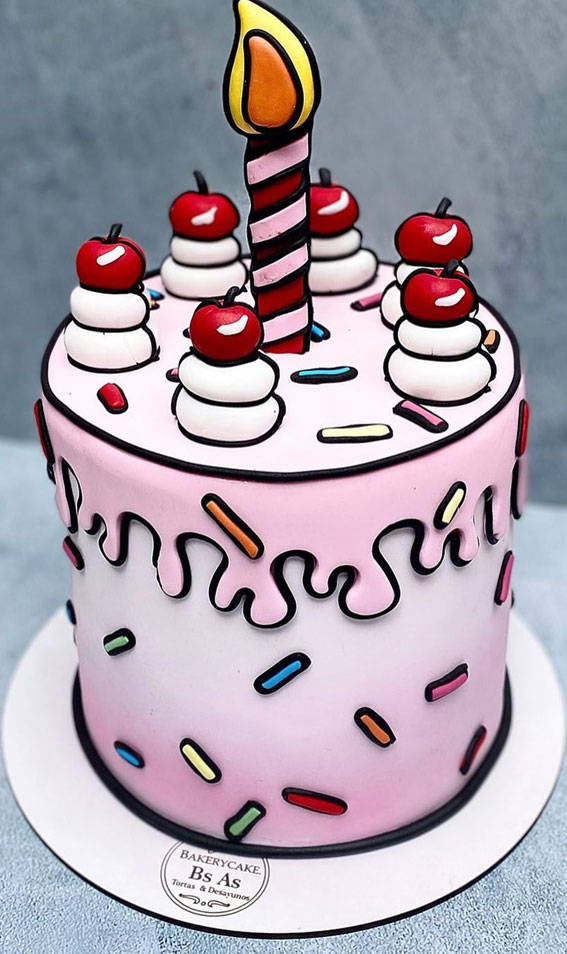
More inspiration can be found from cake making tutorials, and I found these that gave me ideas. Yes, these are actually 3 dimensional cakes, decorated to look 2 dimensional. Pretty fun!
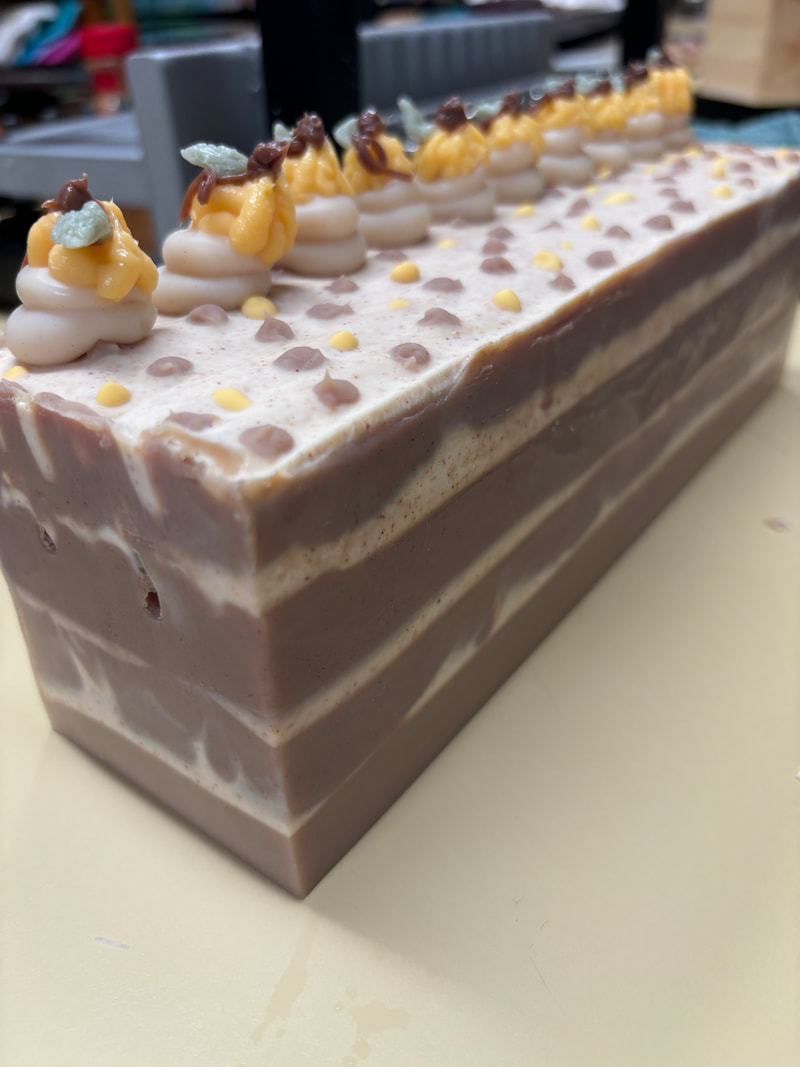
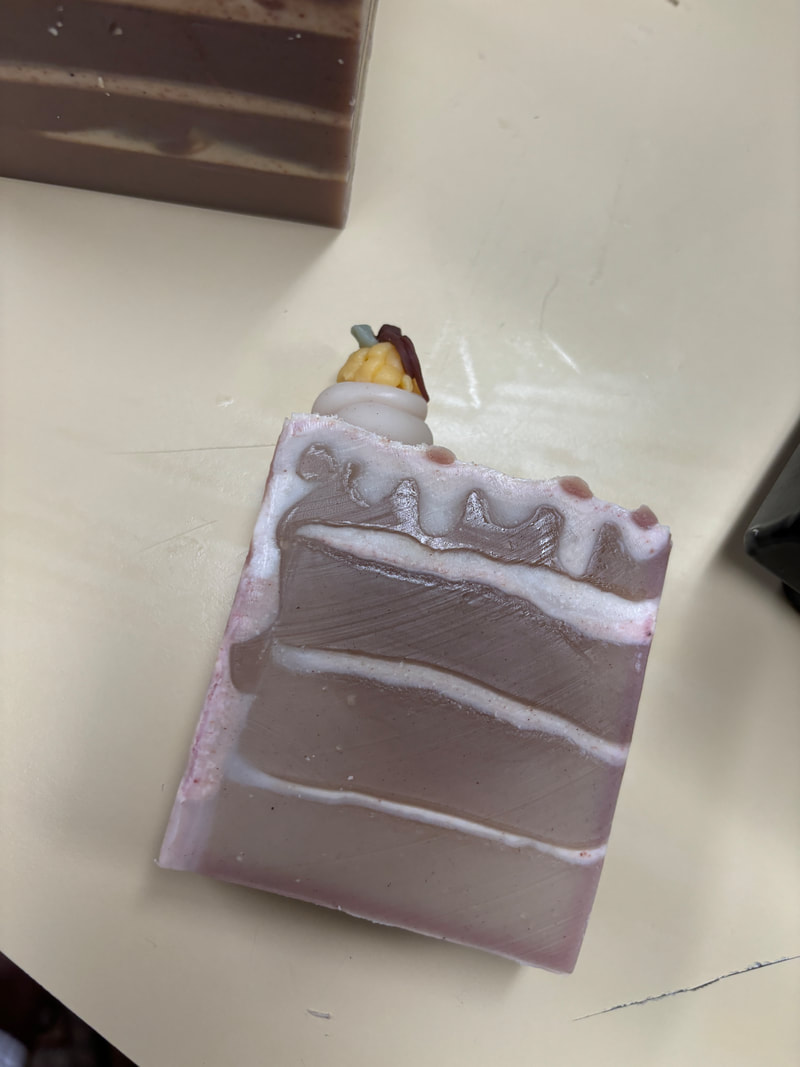
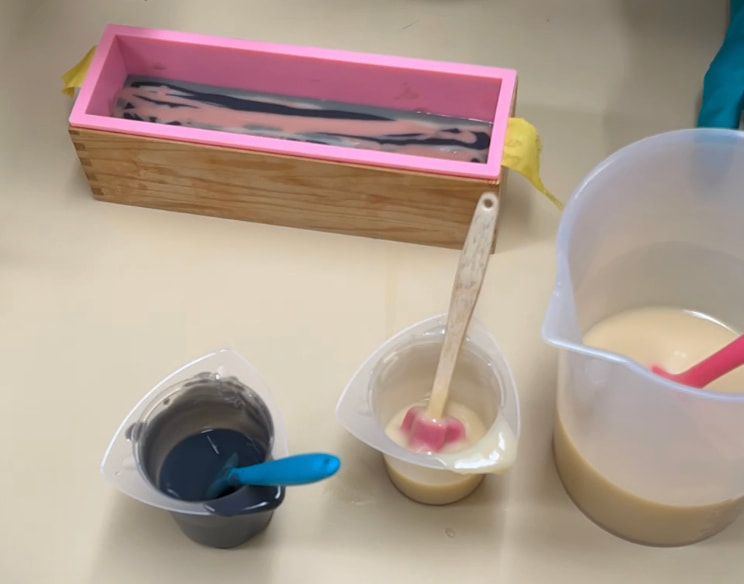
So, I decided to make a pumpkin spice cake, with fond memories of the spice cake my grandmother always made :) I wanted to add the side frosting to the design, so I placed a divider in the mold leaving about 1/4" space to pour the "icing" along the side while pouring the layers. My cake is a four layer spice cake - brown "cake" and white "frosting". All layers also had cinnamon added for a speckled, spice cake look. I also sculpted the top layer, for a bit of the dripping frosting look. I didn't go too deep though, as the layers were starting to firm up already - thank you clove! Once the layers were poured, I piped a bit of "cream" on one side and added a piped pumpkin as well. Some pumpkins are better than others, but the addition does give the feel of fall. I did not get around to taking photos of the process, but here is the soap poured and piped.
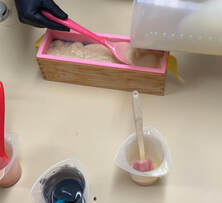
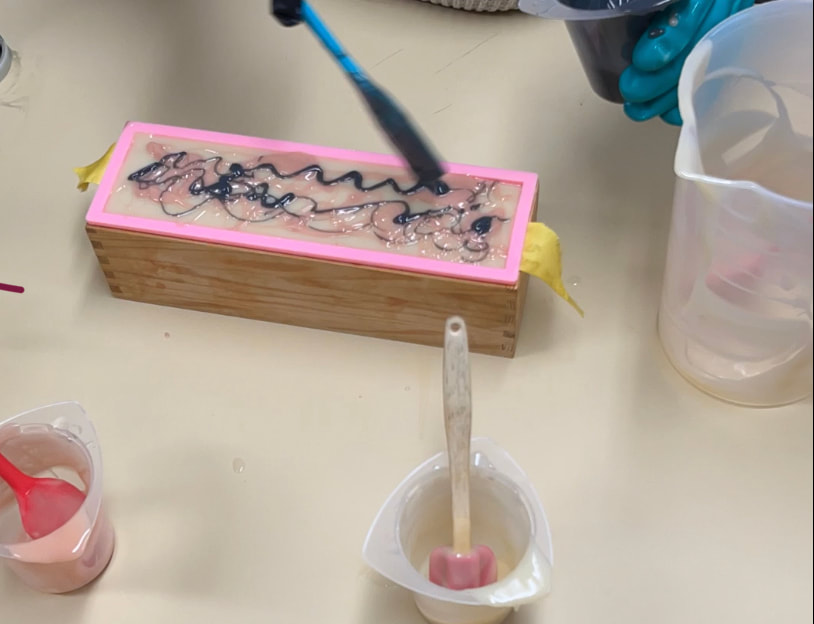
I unmolded the soap loaf and cut one bar at a time to keep them from drying out in between piping each one in the comic style. I followed the idea in one of the cake tutorials, where you pipe around the entire shape of the soap, and you see that outline when looking at it straight on. Afterwards, I noticed that the soap examples had minimal black piping, and maybe these would be better that way? Or maybe better with a white piping instead, since the cake itself is fairly dark? I did play with the line thickness, and I'm not really sure which I like best.
This was a fun diversion, and just what I needed this week! Thank you Amy!
4 Comments
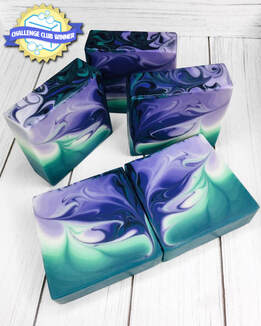
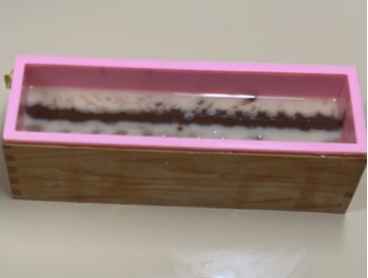
It's been a while since I've entered a soap into a challenge, and as I start the new year, I'm picking up Amy Warden's Soap Challenges once again. It's always fun to see what other people are making and how they bring their creative energies into the world of soap making. This month's challenge is focused on perfecting Wall Pours. This month, in addition to there being three different levels of entry, the techniques associated with them vary. All of the techniques involve pouring the soap batter along one wall of the soap mold to create your design. Regular category will be pouring single colors, Advanced can choose between what we call a One Pot Wonder, or a Woodgrain design, and the Winners category will enter soaps with an ombre design, hopefully with seamless transitions :) Here are example photos of each of the categories:
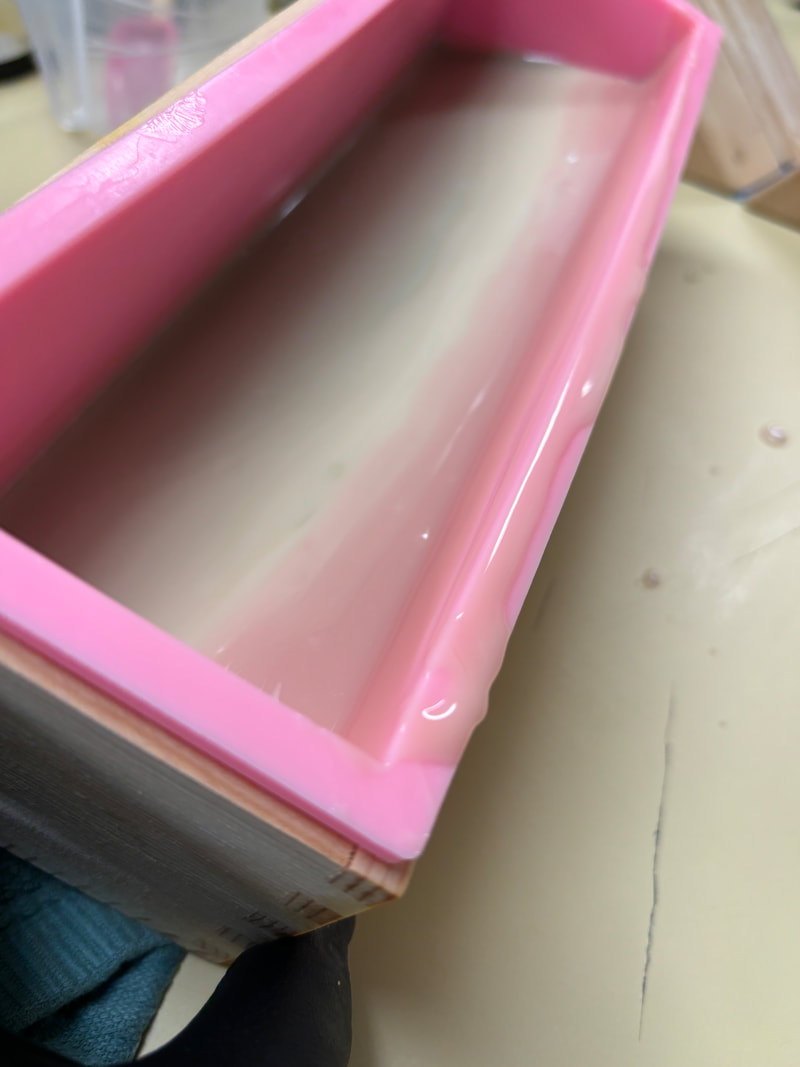
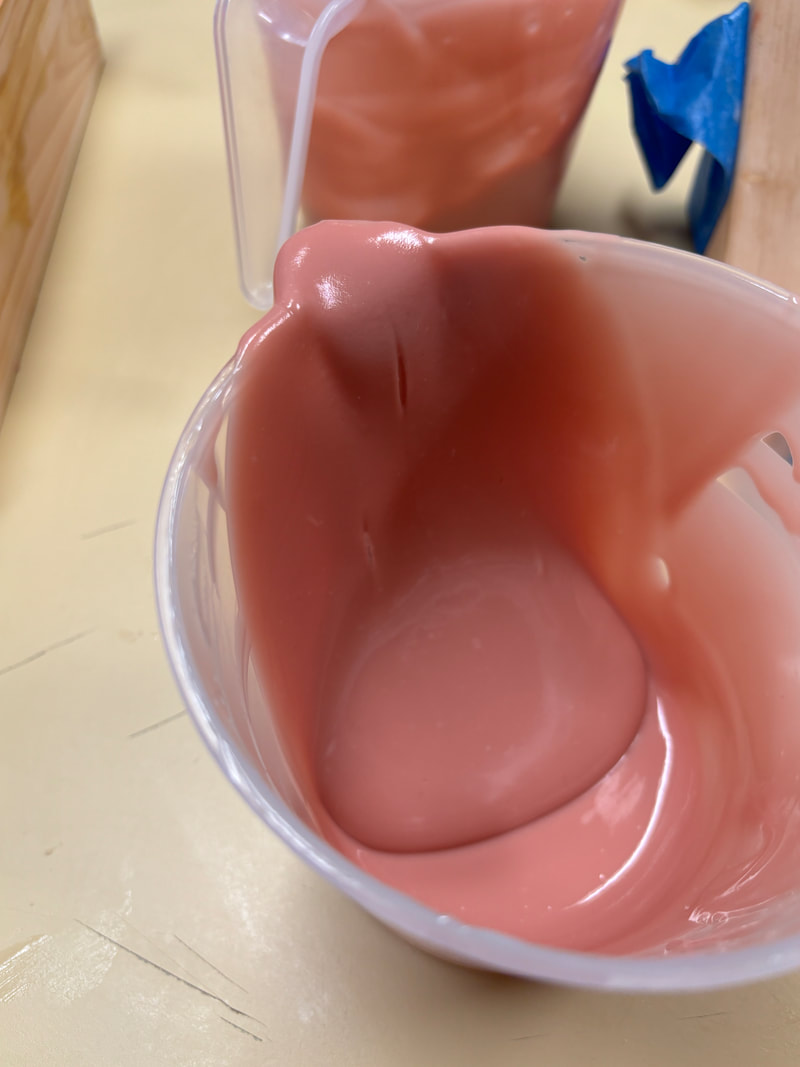
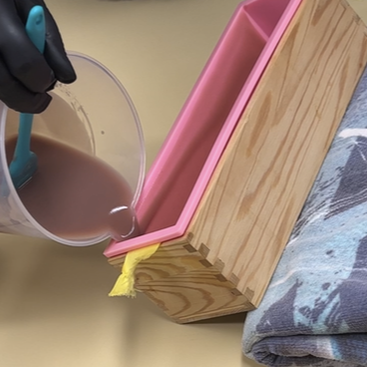
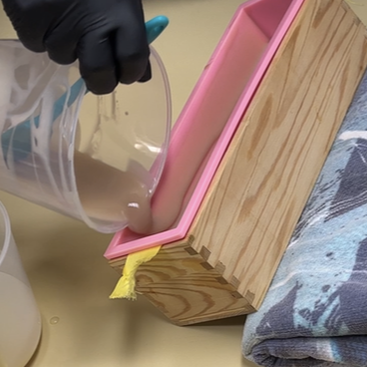
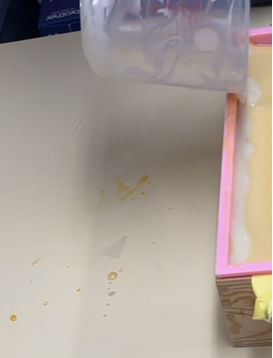
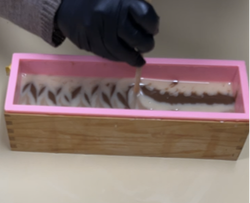
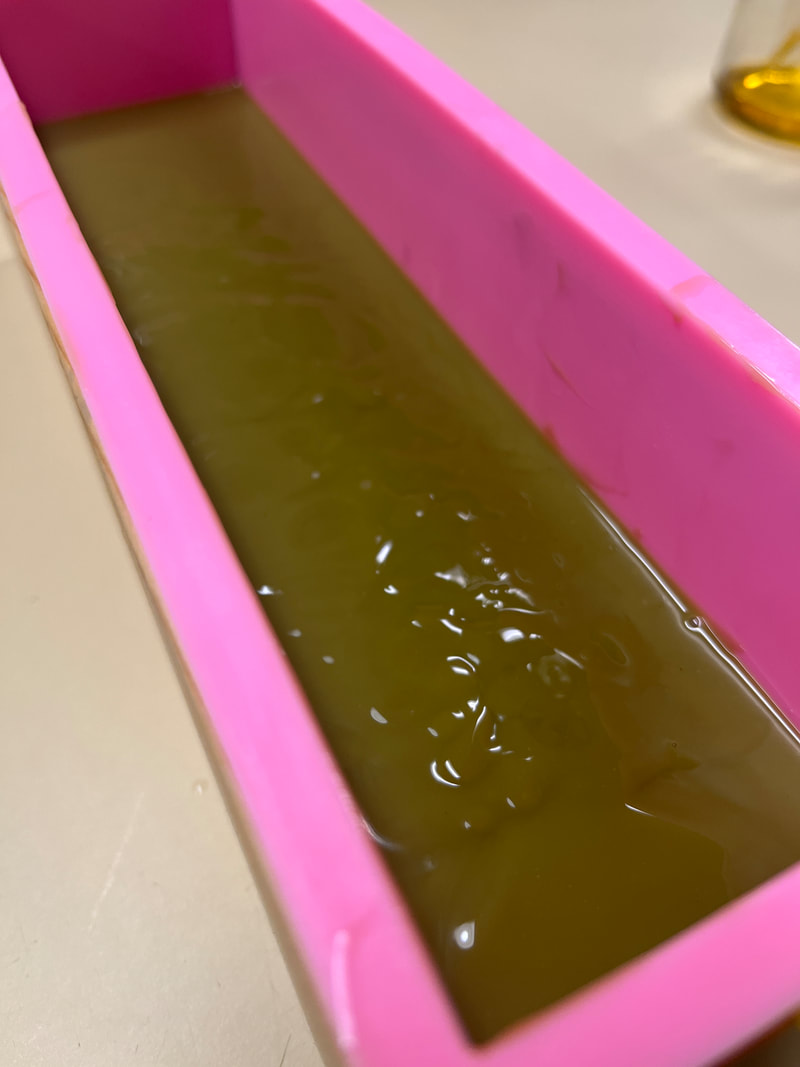
Since I've been making soap for a while, I generally enter the Advanced category. The Winner's category is reserved for those that have won the Advanced category a few times, which is definitely NOT where I am :) But...If you know me, you also know that I'm always up for a challenge! With this being said, I decided to do an ombre as I love this technique. I've had varying success with it and more experience is always warranted, however, past soaps I've created in this style have turned out quite lovely, so....why not? To begin, you choose the colors to use. I decided to jump out of the cold winter season and fast forward into warm summer days with a Watermelon Ombre. This will take a transition from dark green (annatto seed & indigo) to natural and then natural to dark pink (rose clay). The idea was to have mostly pink with the green "rind" on the bottom and side. So, the majority of the soap batter was pink in color.  Then you start pouring evenly, back and forth, along one wall of the mold. You add a bit of the next color, stir well, and pour similarly again. Repeat until you have successfully transitioned to the second color and then move into the next color, etc. I started with the dark green, added natural, then started adding the pink into the natural to bring it up to the full dark pink shade. It helps to have the mold at an angle, especially at the beginning. Here, I have used some blocks to assist me, but you can also just use a rolled up towel or other prop.
As the mold fills up, you will want to lower the angle or eliminate it all together. I moved to utilizing a towel, before having the mold level on the table.
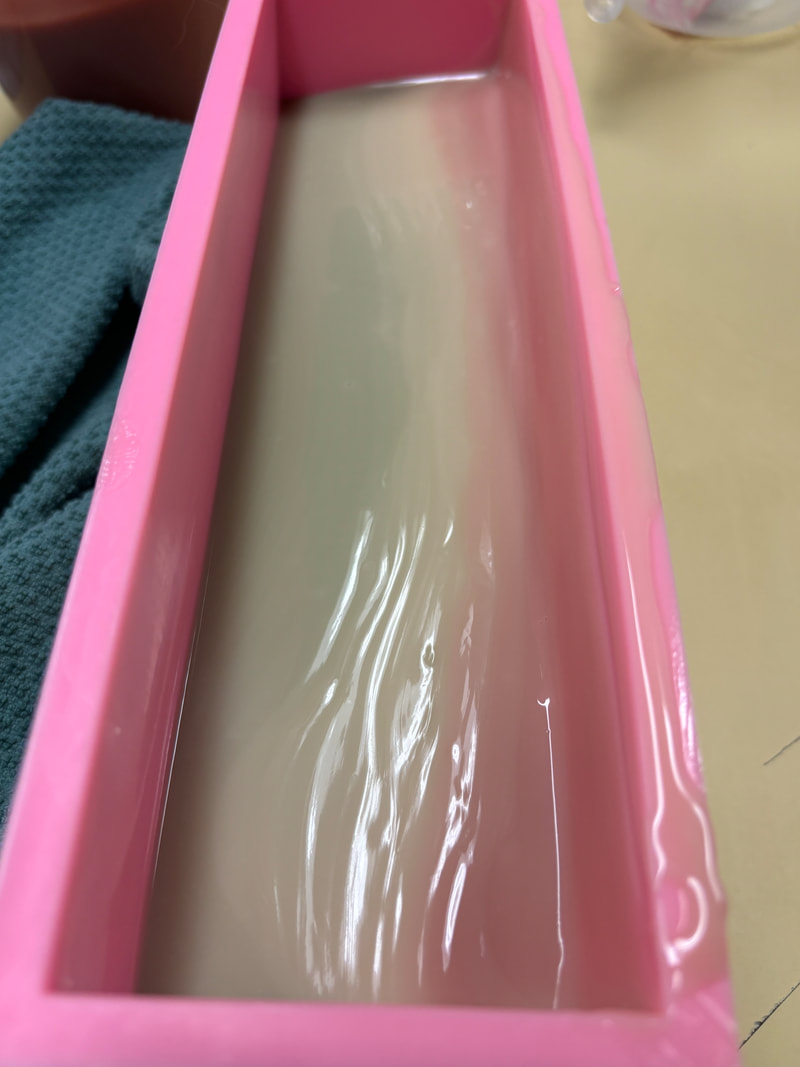
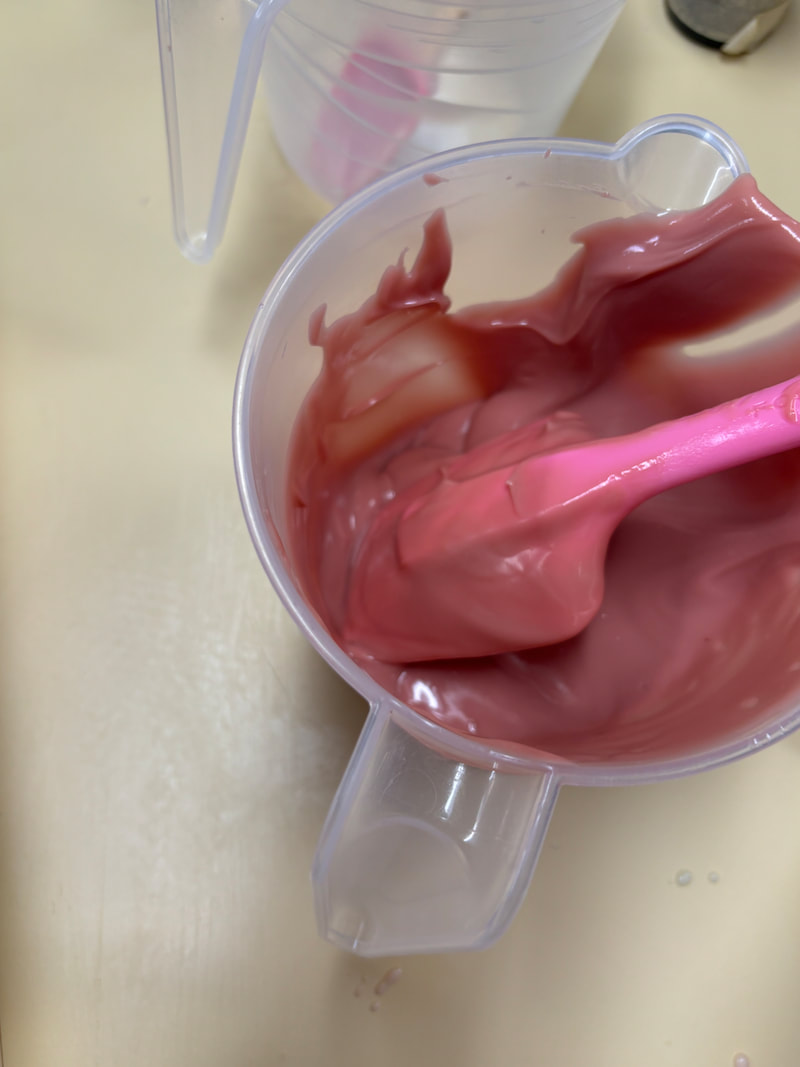
The key with this technique is being able to keep all the colors fluid long enough to get them all poured into the mold. Things that make this particularly difficult are additives to the batter. It seems to me that indigo tends to allow the batter to stay fluid longer? Not sure if this is a real thing or not...but it's been my experience. Also, certain essential oils or fragrances will make the batter set up quicker, while some keep it more fluid. Clays tend to thicken it up - which was my nemesis on this batch. So, I had to continually stir up each of the batters during the extensive length of the pour. Even doing this, the pink got pretty thick and I was concerned it would not pour well for me.
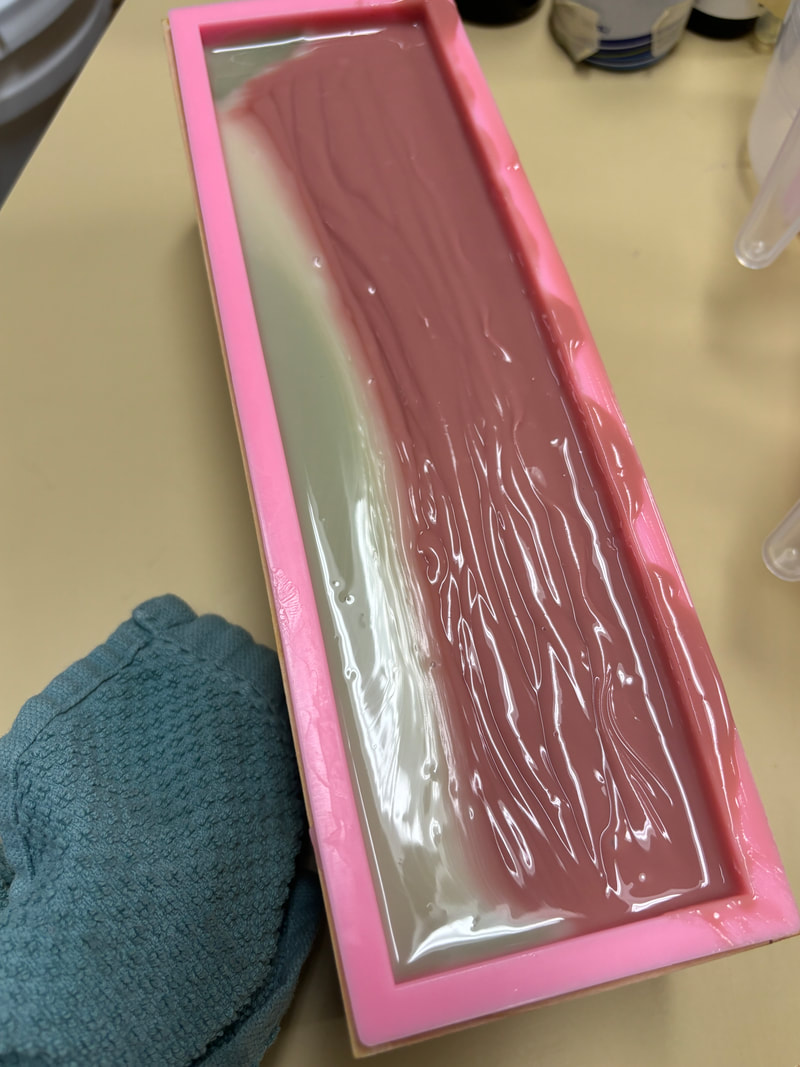
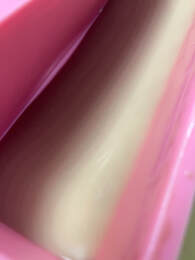
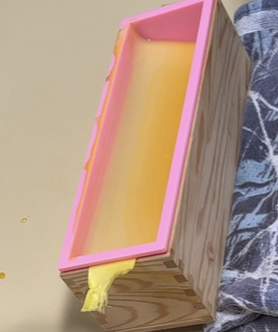
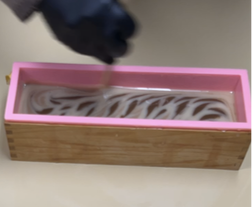
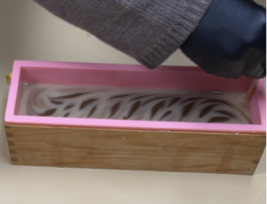
Lucky for me, my design was such that I was not relying on smooth transitions at this point - everything was just pink. So, it was a matter of getting it into the mold without disrupting the existing gradient. It was a challenge, and I wasn't entirely sure it was working, but I got it done :) I added a bit of the leftover colors to the top and swirled it to make it pretty.  My favorite, and most anxiety producing, part of the process - the morning cut! Here's what the loaf looked like before cutting.
And...the cut!
The green transitions are beautiful & fine, but the pink is a bit more abrupt than I wanted. This is most likely due to using a bit too much rose clay in the batter and the thickness of the batter at the end of the pour. The watermelon effect turned out better than I anticipated though. These bars are scented with a splendid combination of Watermelon & Mint, and the soap kitchen is a wonderful place to be this week! For the challenge, no embellishments are allowed, so my entry photo is one of the above. However, I just couldn't resist adding some extruded seeds to the top :) This picture shows them while they are still drying...you can see where I added them on with a dab of water. These bars will be available to purchase early summer!  Embrace Natural Repellents |


 Regular Category | 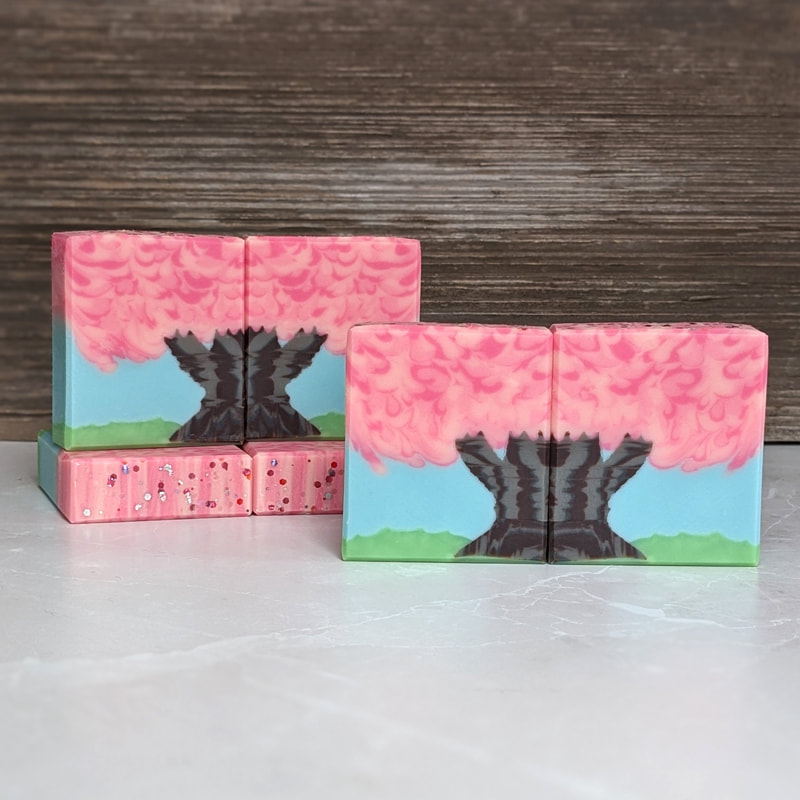 Advanced Category |
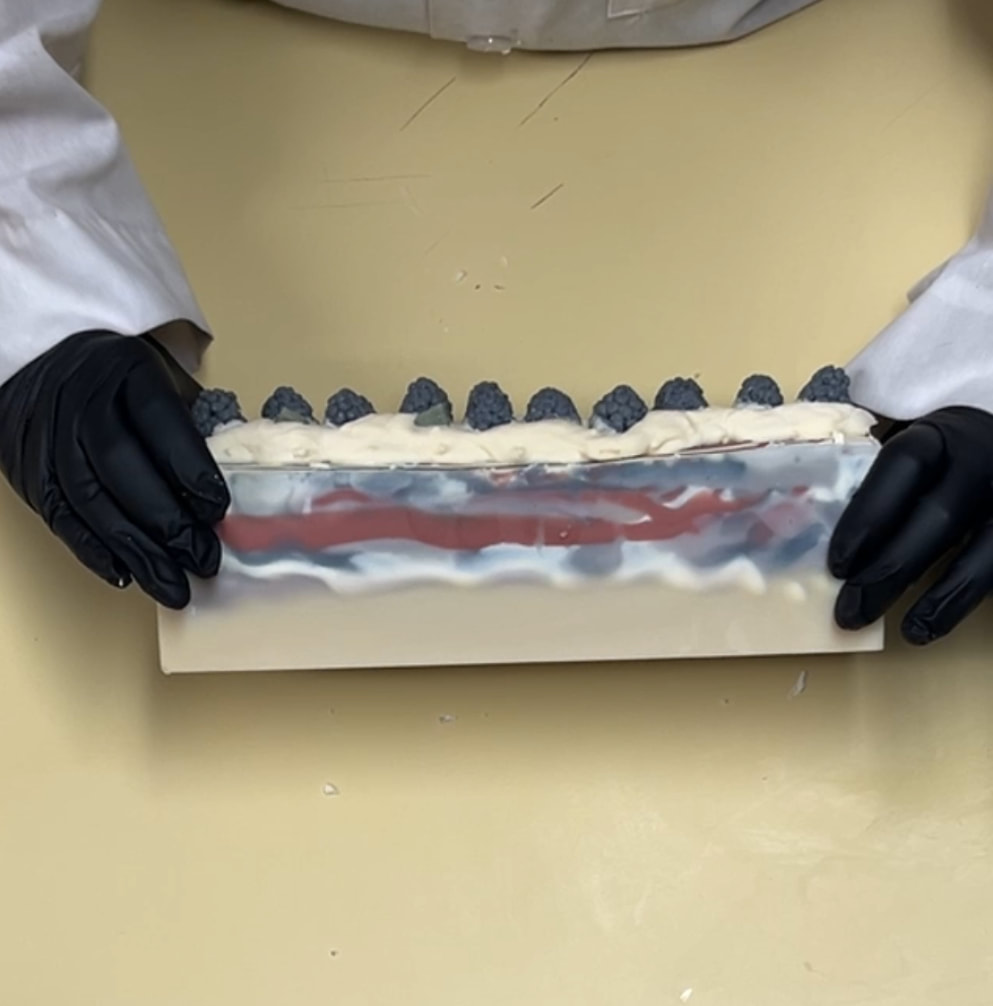
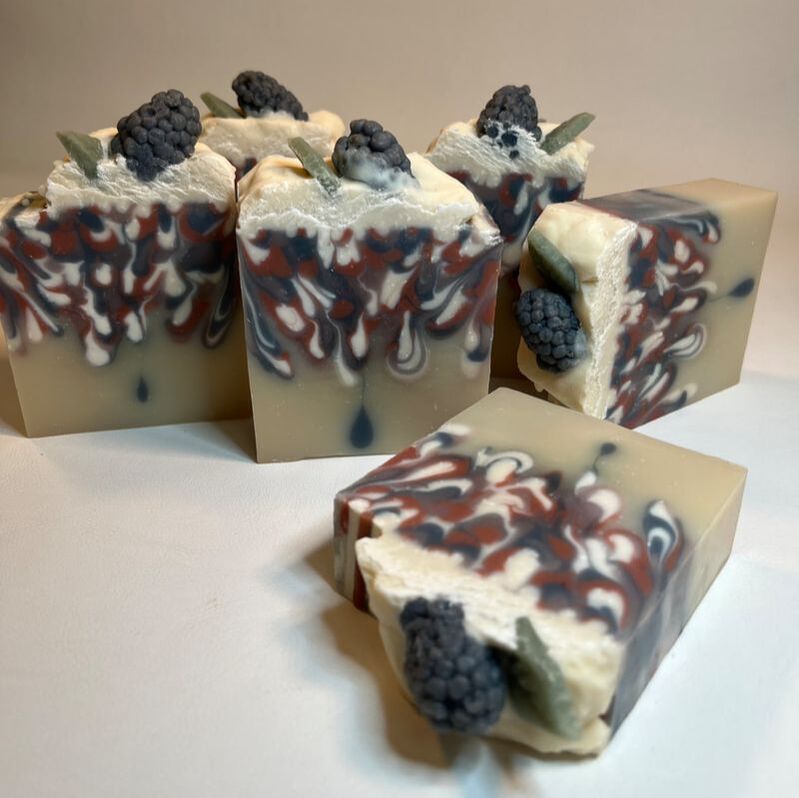
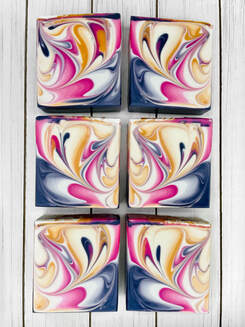
When I made these soaps, my mind was on Mother's Day and I decided to create a Berries & Creme soap. The idea was to add a bit of coconut milk for the "Creme" and the fragrance is Berry & Mint. I colored the soap with a combination of blue (indigo), purple (alkanet root) and red (rose clay). I wanted a greater contrasting white along with these colors, and that is difficult to obtain using natural ingredients, as I do not use oxides, micas or dyes. Therefore, I decided to use the saline lye technique once again (I used this method for the Cinnamon Buns last year and it worked quite well!) to get a brighter white. I'm also SO loving salt in my bars these days :).
 |  |
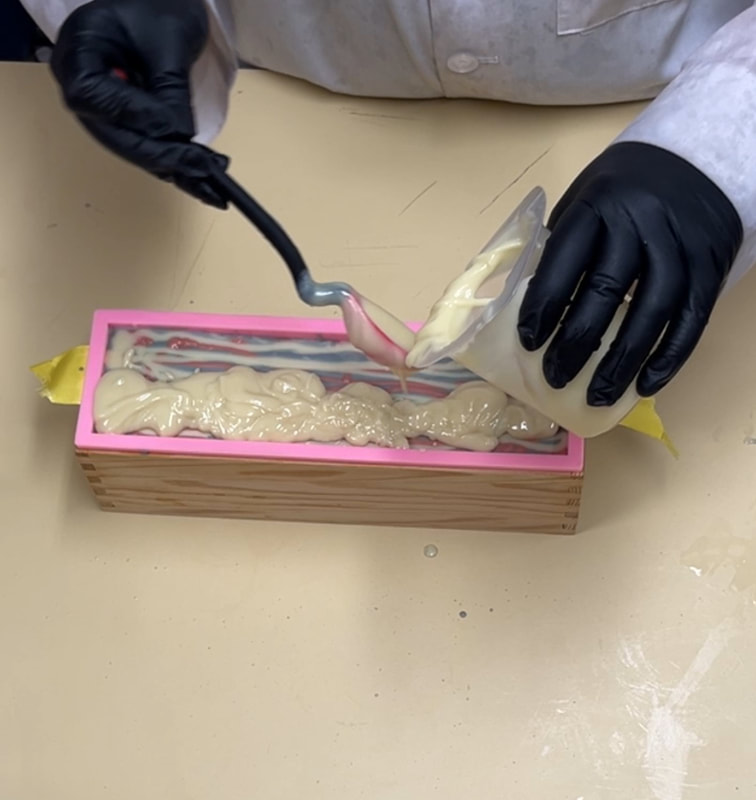
With the drop swirl technique, you place alternating colors of soap batter on top of each other in lines. This is best achieved using squeeze bottles, but you can also use other pouring techniques which would vary the size of the drops and the width of the color in the final design. I decided to use my squeeze bottles for this batch. After making up the different colors and bringing them to emulsion, I divided them into their respective bottles. I then poured the reserved bottom layer of naturally colored batter into the mold.
 |  |  |
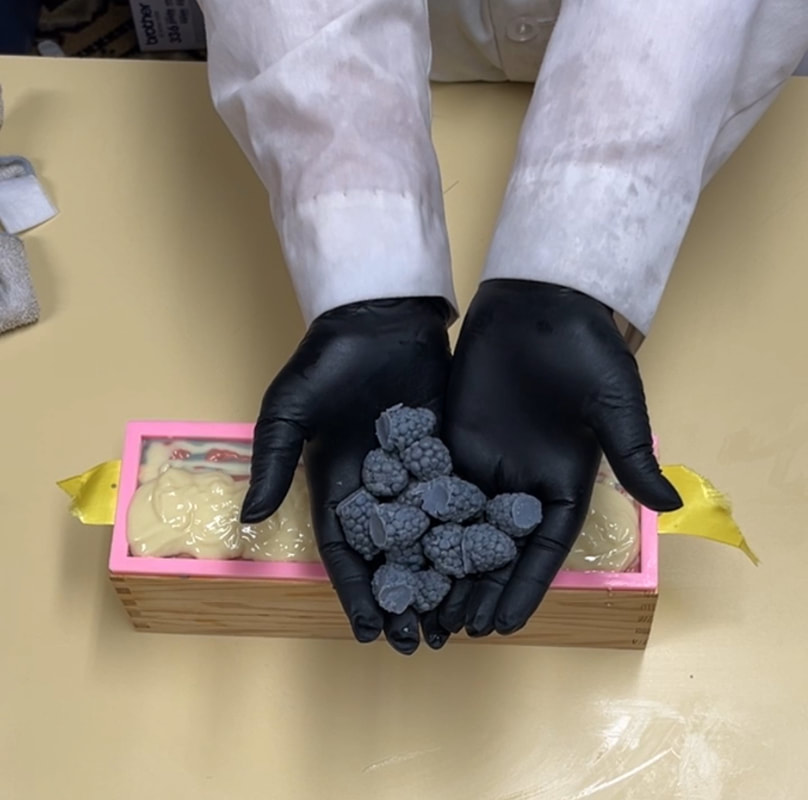
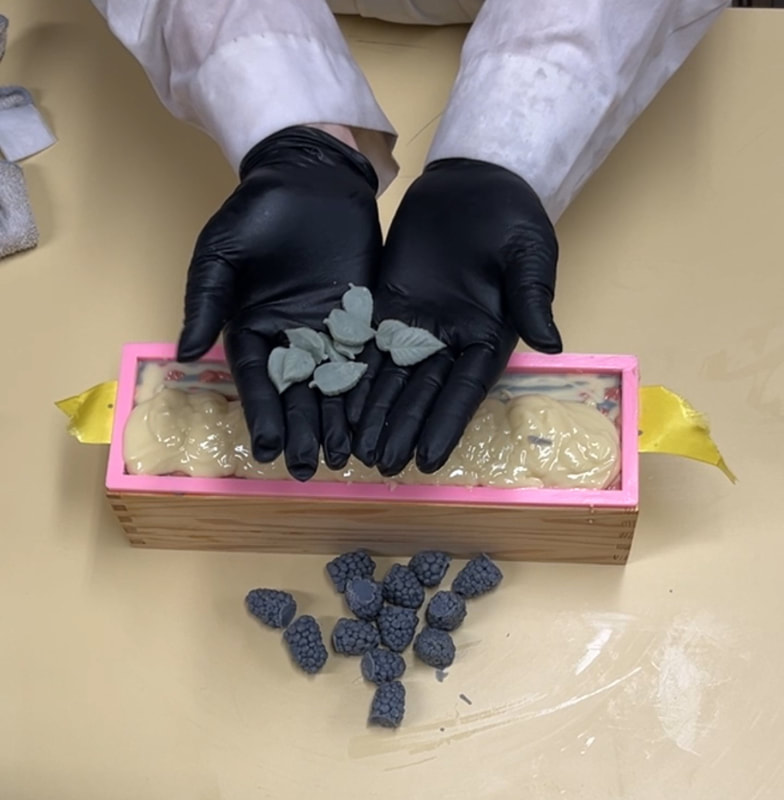
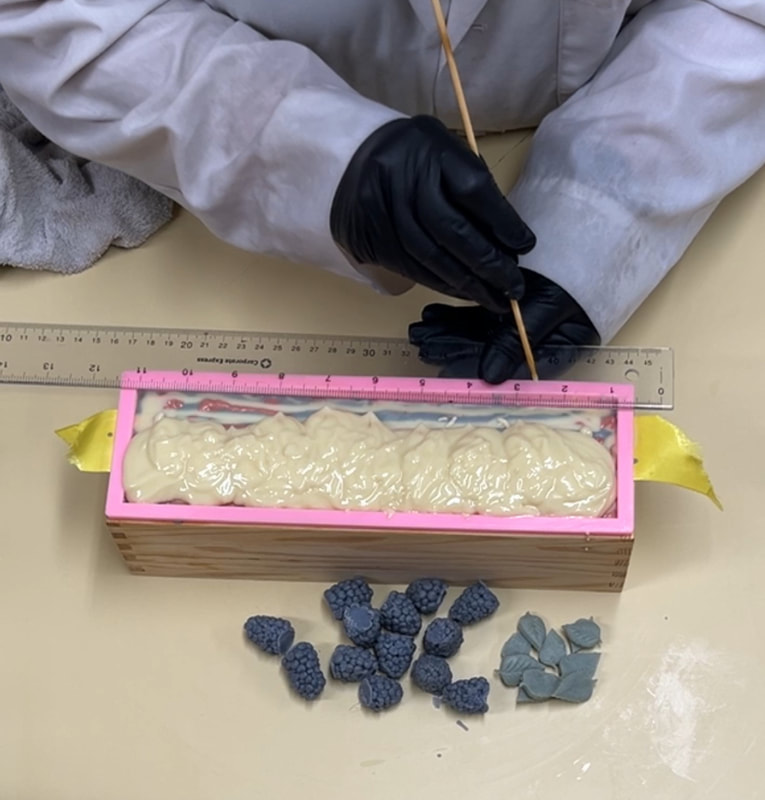
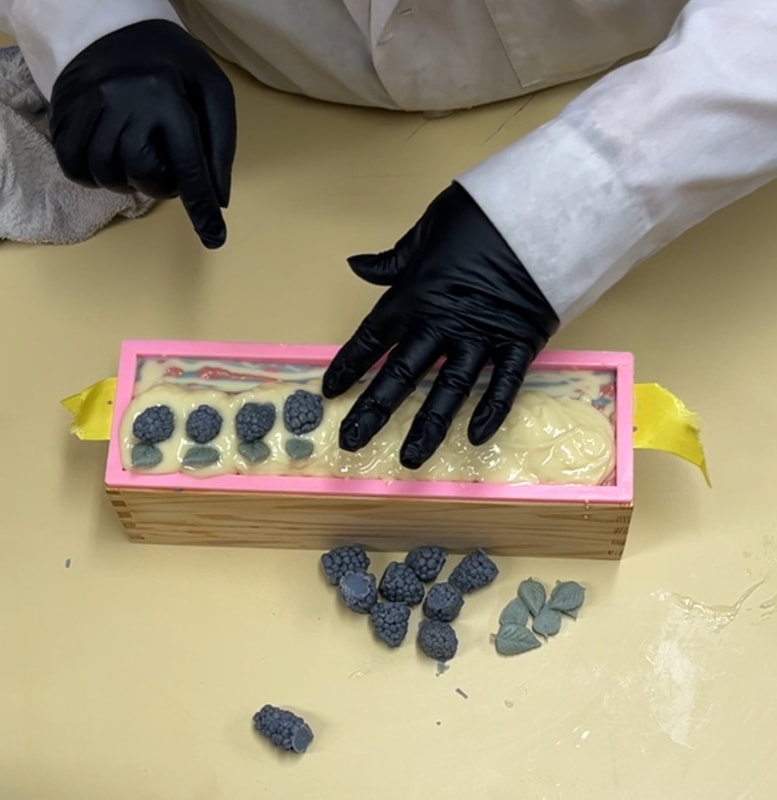
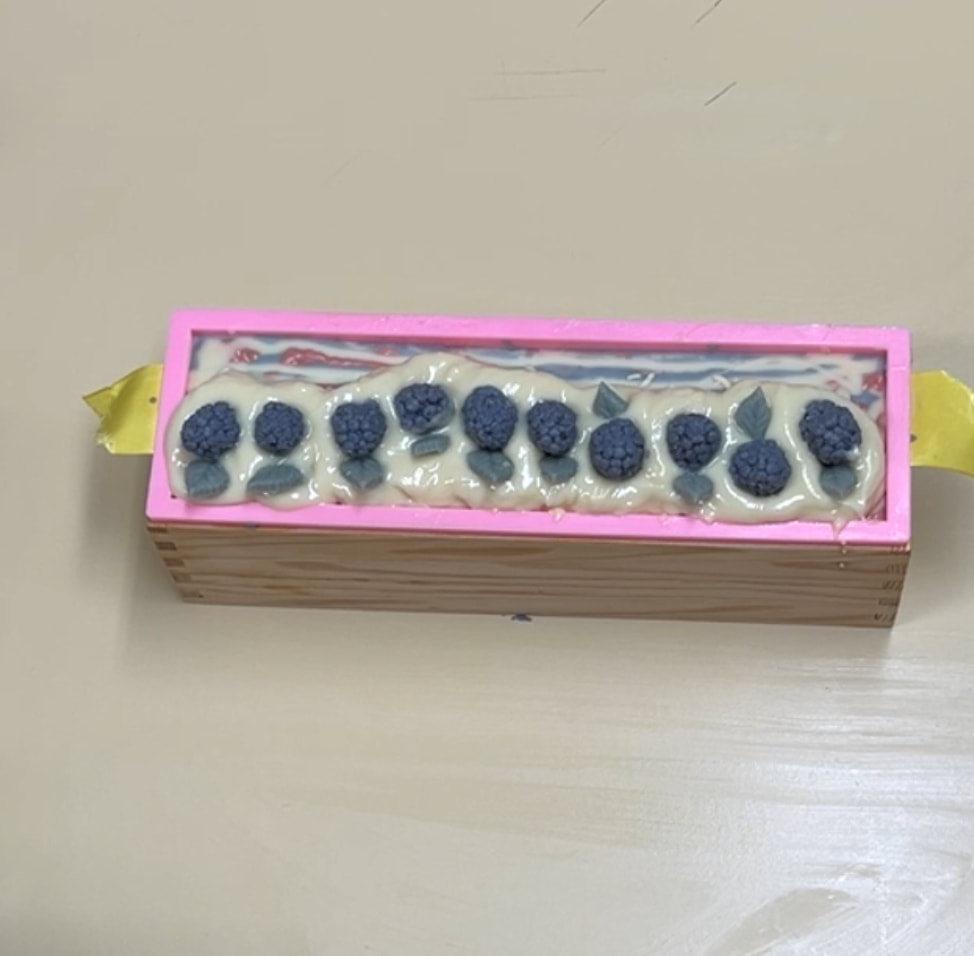
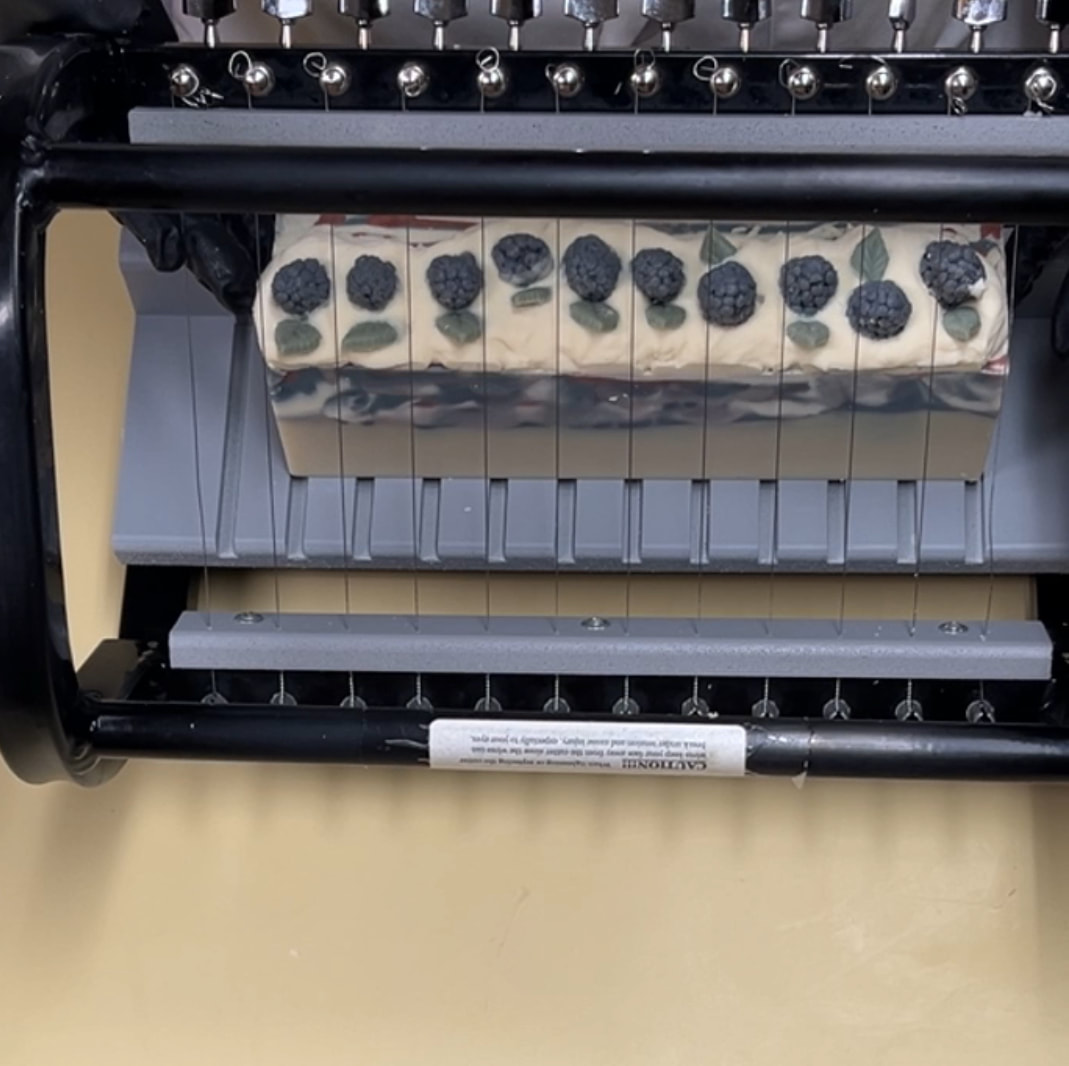
Then I proceeded to add the layers of color, all the way up to the top of the mold. The drops variation also depends on the thickness of the batter, and the distance used when pouring the lines. Once that was completed, I waited (while cleaning up the mess I'd just made...) for the reserved white batter to thicken up enough to look like creme when placed on the top. I had some berry embeds that I made the day before at hand, and created some leaves using soap dough and a fondant mold. These were placed on top of the "creme" at one inch intervals, to ensure that the embellishments would slide through the cutter properly.
 |  |  |
Once that was completed, I waited (while cleaning up the mess I'd just made...) for the reserved white batter to thicken up enough to look like creme when placed on the top. I had some berry embeds on hand, that I made the day before, and created some leaves using soap dough and a fondant mold. These were placed on top of the "creme" at one inch intervals, to ensure that the embellishments would slide through the cutter properly.
 |  |  |
 |  |  |
After putting the loaf to "bed" my concerns were that the contrasts were not going to be very visible in the final bars. The batter of the indigo and alkanet root soaps were so similar, and, not having done the saline soap very often, it's always a concern if it will pop the way I want. However, after unmolding, it was clear that all the colors were showing up quite well, with wonderful contrast.
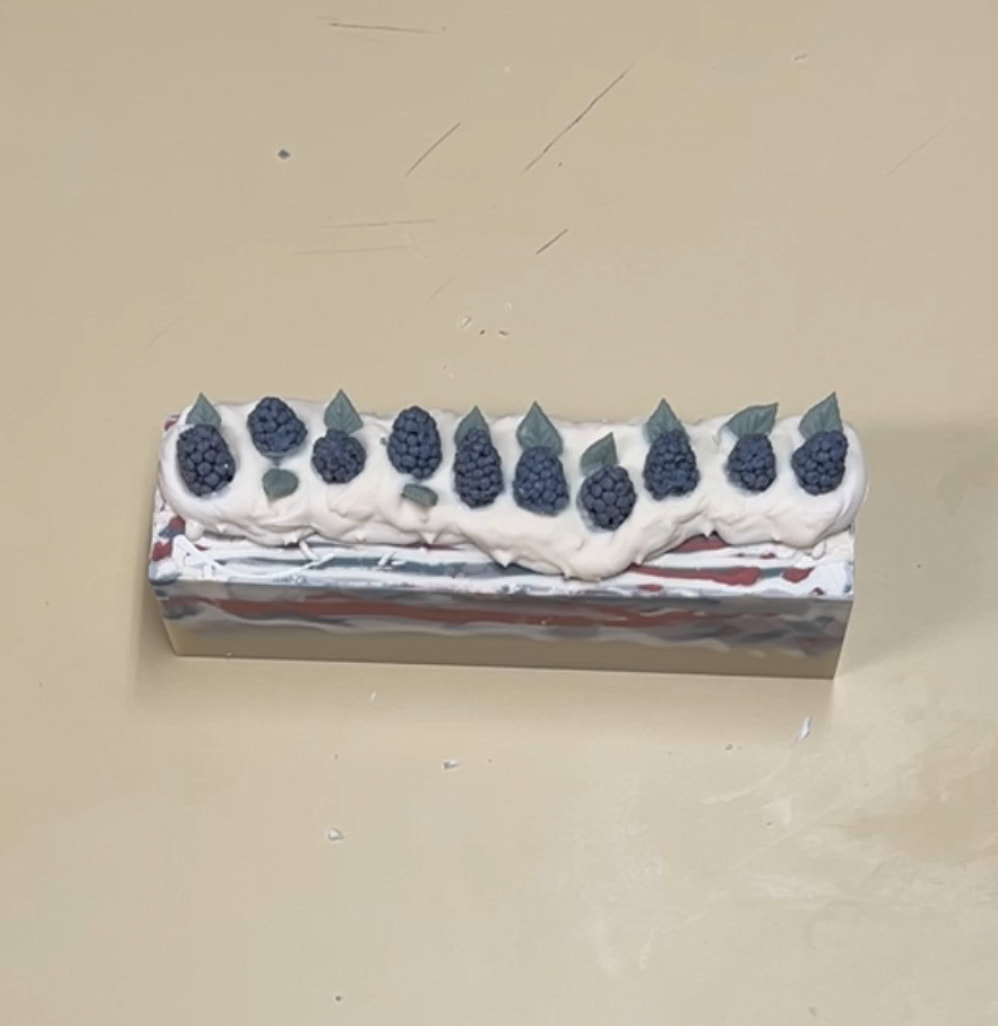 | 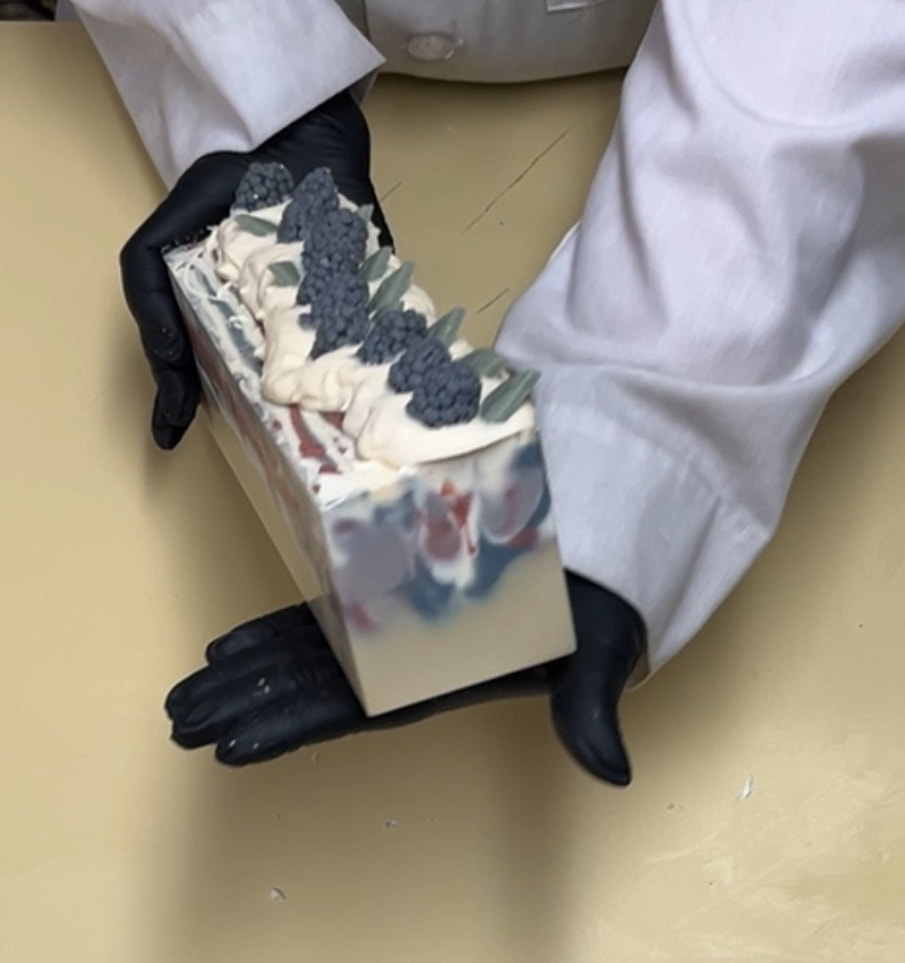 |  |
The cut is always the most fun, as well as most nerve wracking part of this whole process. I was so anxious that it wouldn't come out the way envisioned, but I was not disappointed. Look at that bright white! These bars turned out to be stunningly beautiful, and the scent is lovely - something that customers will certainly love :)
 | 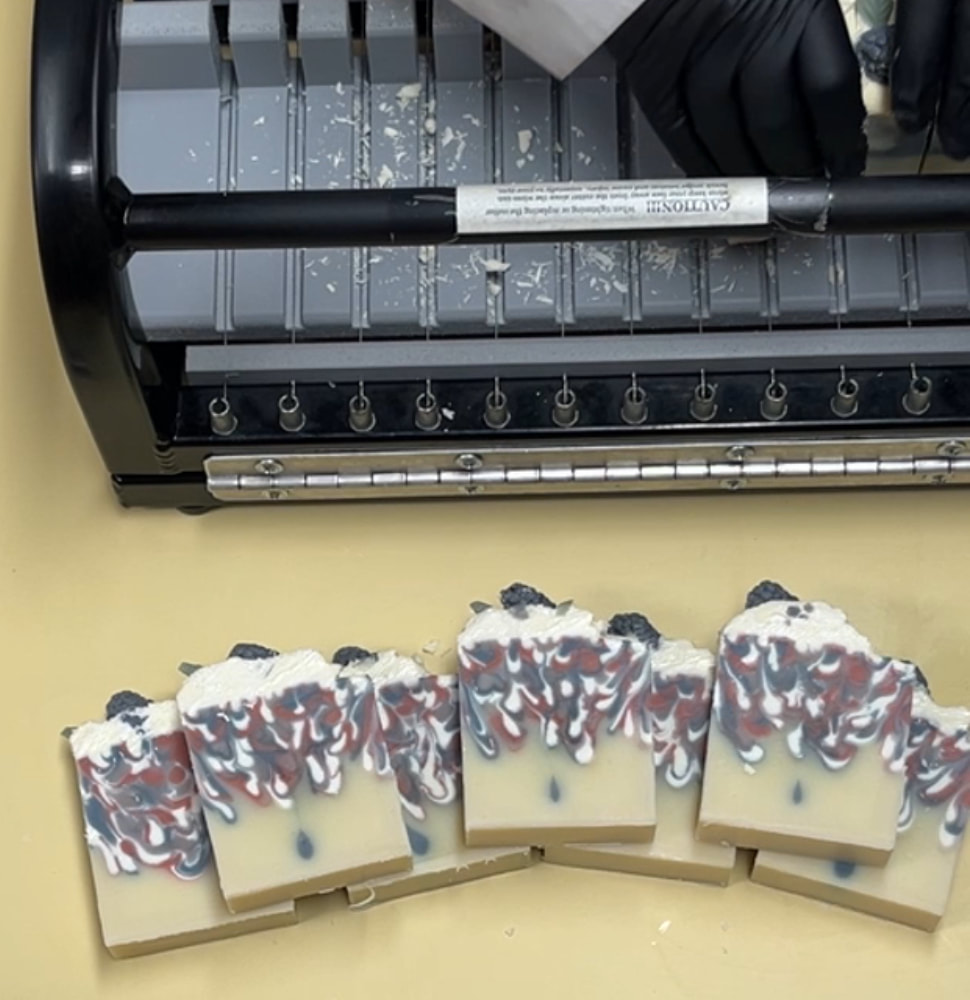 | 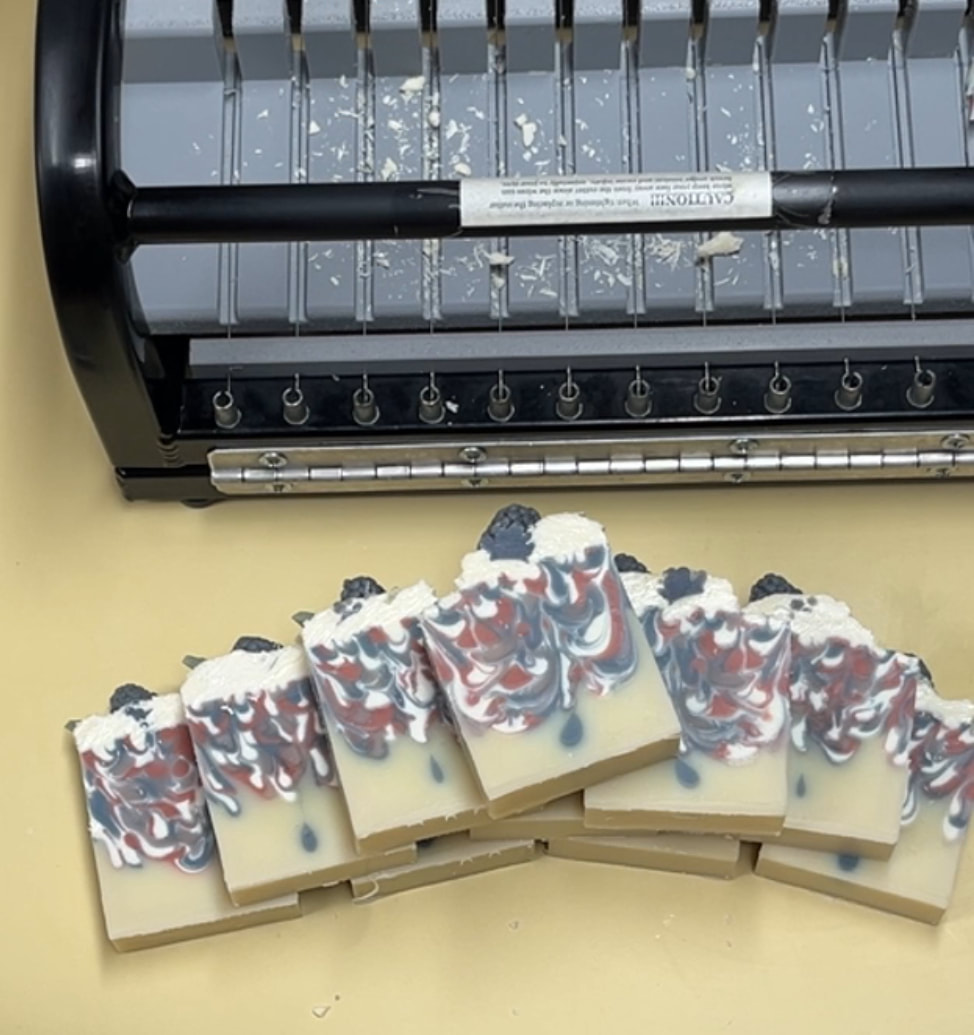 |
These bars turned out to be stunningly beautiful, and the scent is lovely - something that customers will certainly love :)
Thanks for reading through to the end!!!
Thanks for reading through to the end!!!

Earth Day...something that is well marketed every year. But, how do YOU incorporate YOUR appreciation for our planet into your every day life?
With my early background working for New York State's Dept. of Environmental Conservation, hiking time in our many forests and parks and so many more life experiences, I have a strong sense of trying to do my part to reduce any impact I have on our beautiful surroundings. From "packing out what I pack in" while hiking, to deciding what to buy in the grocery...it all adds up.
So, with that said...do you think about how your items are packaged when you make purchasing decisions? This is something that has grown in my mind over the years, and has recently peaked with the new $0.10 bag fee put into place here in Colorado. It annoys me that nearly EVERYTHING I put into my own reusable bag is packaged in plastic. Some items might "need" to be in plastic? But I'm thinking that with some creative manufacturing "genius" that should not be a reality.
Years ago, when we had a working fish tank, we used to take our water over to the local pet store for testing. They would test various parameters like pH, nitrogen, etc. I found that if the water was transported in a plastic container, the outcome was much different than if it were in glass. The important question is why? Most likely because there is leaching from the plastic into the water. Since that time, I have been very mindful of what I purchase in plastic containers, for both health and environmental reasons. Anything acidic (think vinegar...) or oily (like salad dressings) I will ONLY purchase in a glass container, as the potential for leaching would be greater. Unfortunately, I can't find mayonnaise in glass anymore??? That, along with the outrageous prices these days, makes me want to make my own LOL! We get our milk delivered in glass bottles from a local dairy, and if I have to supplement, I will only purchase paper cartons - although they are most likely lined in plastic. YES! All these thoughts, and more, when at the grocery.
Here at ASC Soapworks, we try to be as conscious of these decisions as possible. Most of our Artisan Soaps are completely naked, Signature Soaps are wrapped with simple biodegradable paper, and we have glass and recycled plastic options (preferably made in the USA) for things like our Body Butter and Scrubs.
What about shampoo, laundry and dish soap?
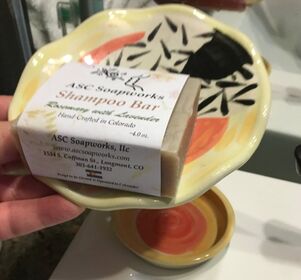
The shower is a location that has a huge potential for accumulating plastic waste, especially as we would not want glass where it could possibly break and harm us. We do make absolutely lovely shampoo bars! And, I have gotten to the point where I prefer not to use any conditioner, letting my own oils condition my hair. Read about part of my shampoo journey HERE!
I see the marketplace making some minimal strives in the laundry detergent realm, trying to concentrate the liquid to minimize the "size" of the plastic. But in my opinion, this just isn't enough. When I make laundry detergent, the "middle product" is a thick paste form which is then diluted in water to form the "end product", and I've been working on how to package it up properly for selling purposes. There has to be a better way!
Over the last year or so, our family has been exclusively using a solid soap block for our dish washing - THANKS TO JANET! who suggested I make some!!! We are a bit on the strange side here in our house, as we don't utilize our dishwasher on a daily basis. We hand wash throughout the day, saving on our electric bill - but probably not on water - and allows our dishes to be more readily available when we want them. We reserve the dishwasher for occasions when we need it, generally when we get super busy in our lives, hosting a larger group of people, etc.
Now, I'm very particular about the cleanliness of my dishes, and have only purchased the "blue liquid" ever since I can remember. I was skeptical about switching it up, and wasn't sure if it would pass my rigorous standards. However, I have to say that I feel the solid soap does an equal, if not better, job - when it doesn't seem to be cutting the grease, a quick swipe across the block easily refreshes its power!
Something to note, and the reason I have not been pushing the marketing and sales on this item, is that it does tend to be a bit "messy" in the soap dish I use. I've tried using a soap lift, various washcloths, etc. to minimize this effect, and have not landed on a solution I'm 100% happy with. So, I'll continue experimenting, and if anyone has any suggestions, I'm all ears!!!
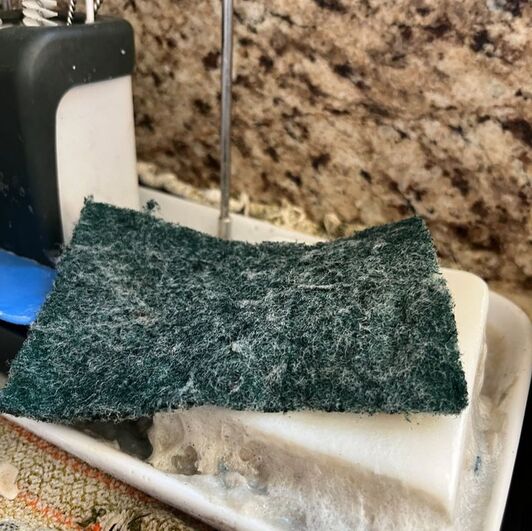
The hardest part of the transition was getting the family to participate, and I had to wait until all the liquid was gone before I saw real involvement from everyone. And, there were grumbling complaints LOL! There is a definite difference in motion with pumping a bit of liquid and doing a swipe :) But, with no other choice, everyone got on board and I'm not sure anyone will go back to the liquid again. It definitely makes me feel better about not bringing as much plastic into the house - only to toss it into the recycle bin later.
If you've never tried a solid dish soap, I would suggest you give it a go!
To get yours today...
CLICK HERE!
If you've never tried a solid dish soap, I would suggest you give it a go!
To get yours today...
CLICK HERE!
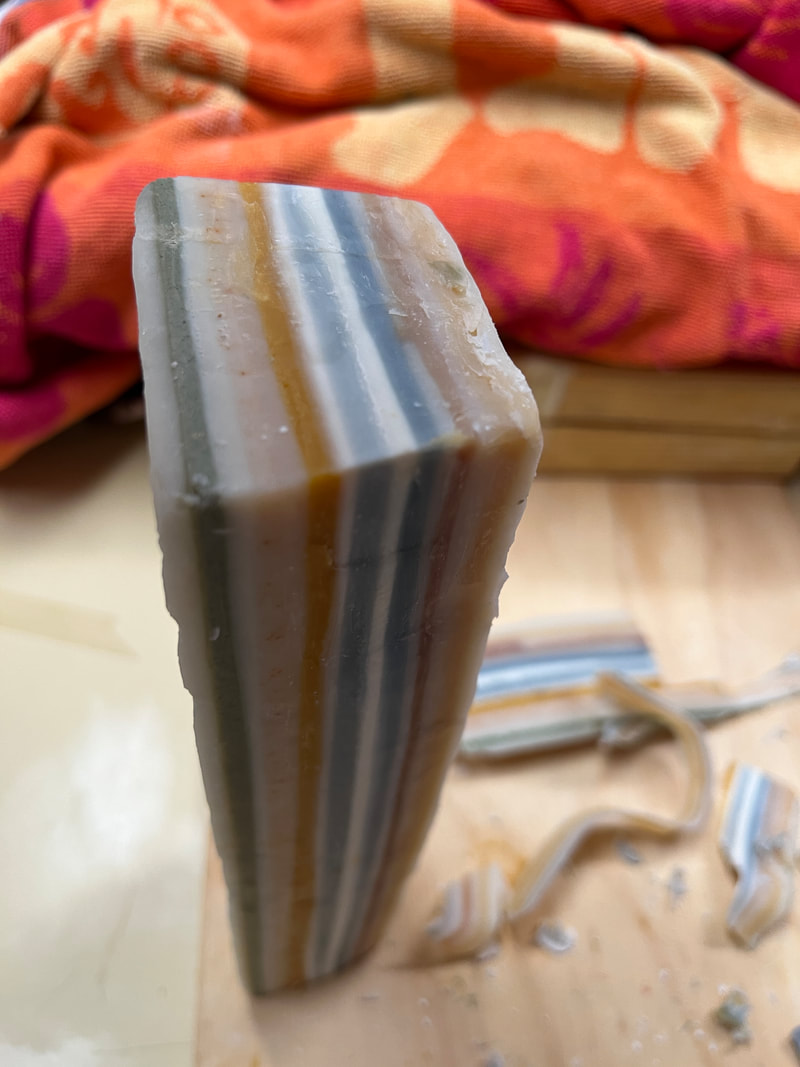
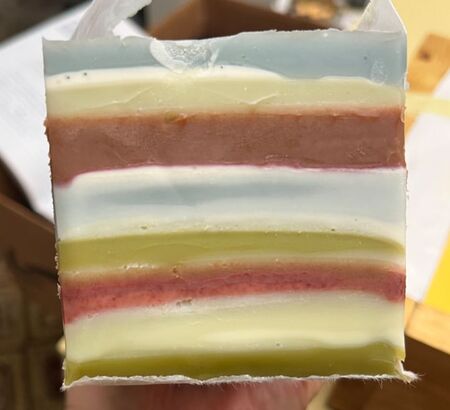
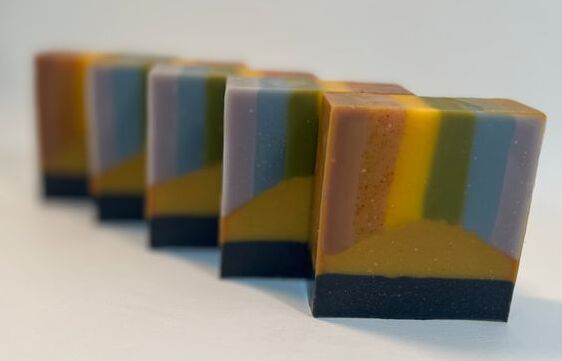
This month, Amy Warden has challenged us to perfect our straight layers. This sparked my mind in so many ways, and there are so many ideas floating around in my head. Earlier in the month I was trying to finish up my fall soaps, making sure that Halloween was done, etc. And, my mind has been working on Christmas soaps as well. So....here are some of what materialized out of this whirlwind of thoughts.
Amy Warden made some beautiful stripes, and her examples are here...
Amy Warden made some beautiful stripes, and her examples are here...
 | 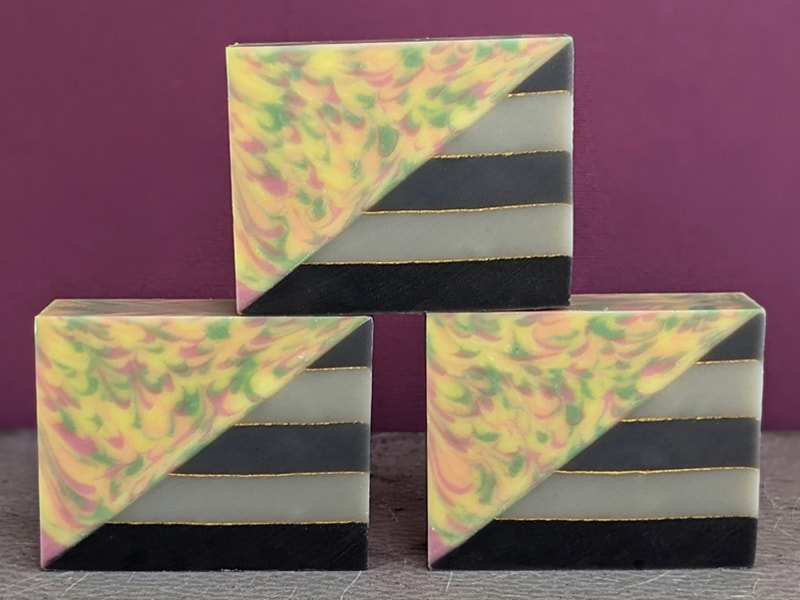 |
For the challenge, beginners were to do at least five layers, whereas more experienced soapers were to add other design elements, with the stripes being at least 50% of the soap. She also has a separate entry group for the people who have won in the past, the winners category. These folks were further challenged to only use plant based colorants in their design. I'm leaning towards entering this category, even though I've never won anything here - for me it's all about pushing myself to learn something new and hone in on various techniques.
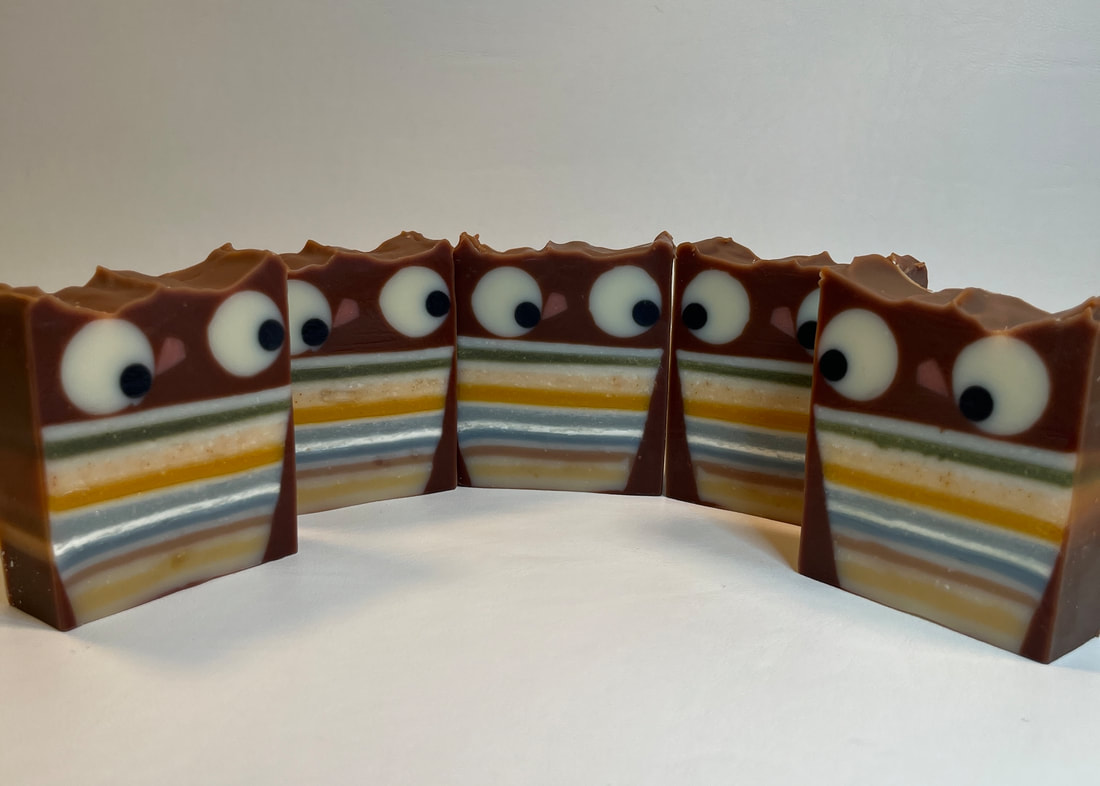
My first attempt for this challenge, was to do an owl with a stripey belly. With this idea, I went looking for inspiration on the web and these two images were the closest to what I had in mind. I drew up the idea on a "soap sized" piece of paper and went to work. I also am not very good with colors, so I found this paper to give me a guide to try to attain.
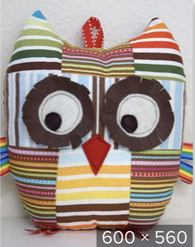 angiesartstudio - etsy | 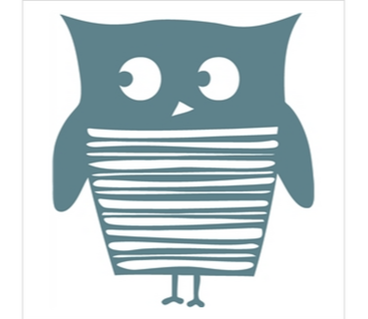 www.heroarts.com | 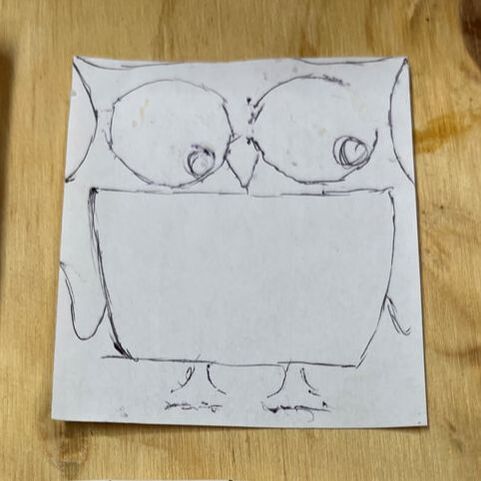 My Initial Design | 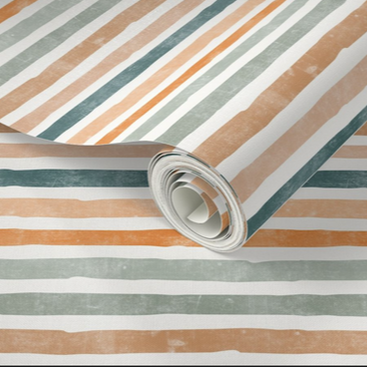 www.spoonflower.com |
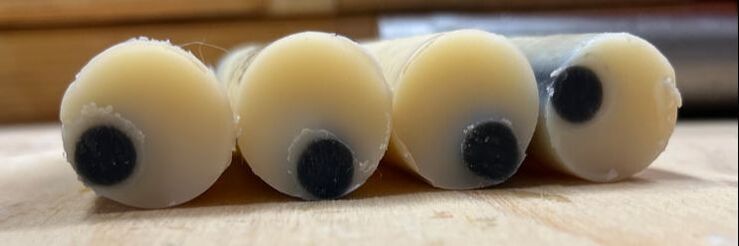
I started with the eyes. This was achieved by extruding black circles and placing them into a larger circular column mold. Here they are before they got cleaned up - ignore that hair there!!!
Then I made the belly. I made random layers of stripes in various shades available within the natural color palette, using the paper image above as a guide. I chose to use annatto, indigo, paprika, rhubarb root and a bit of spirulina. This block was then shaved down to look more like a belly.
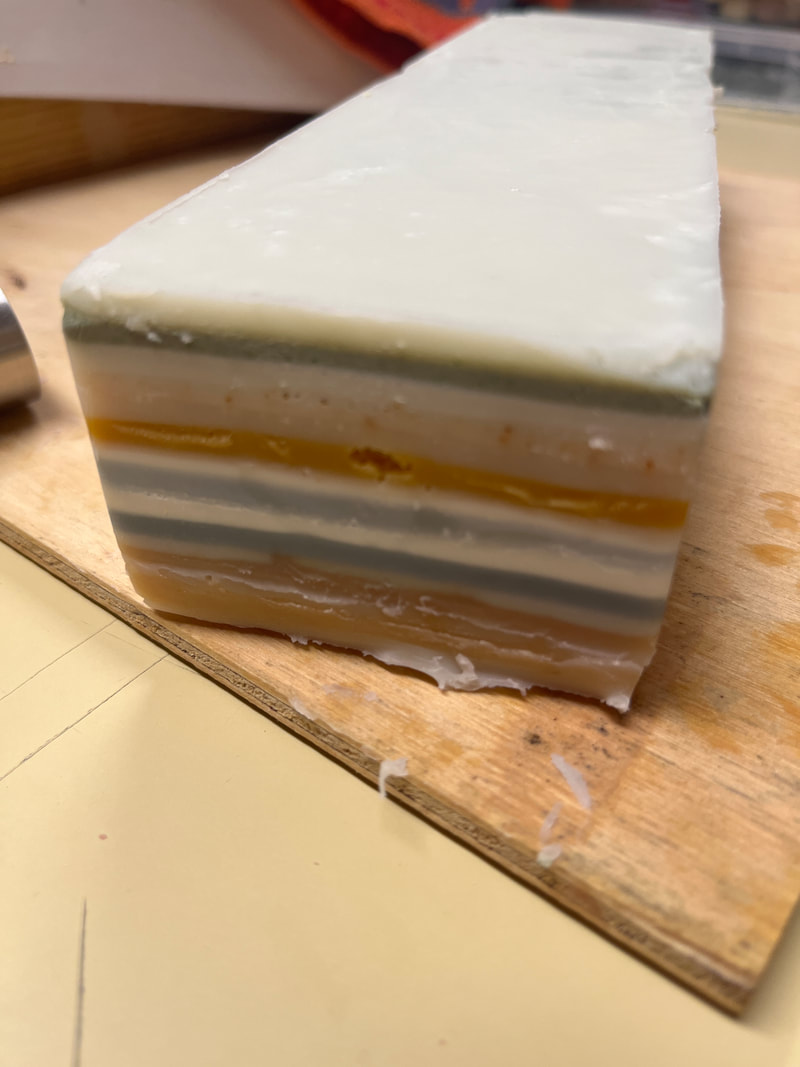 | 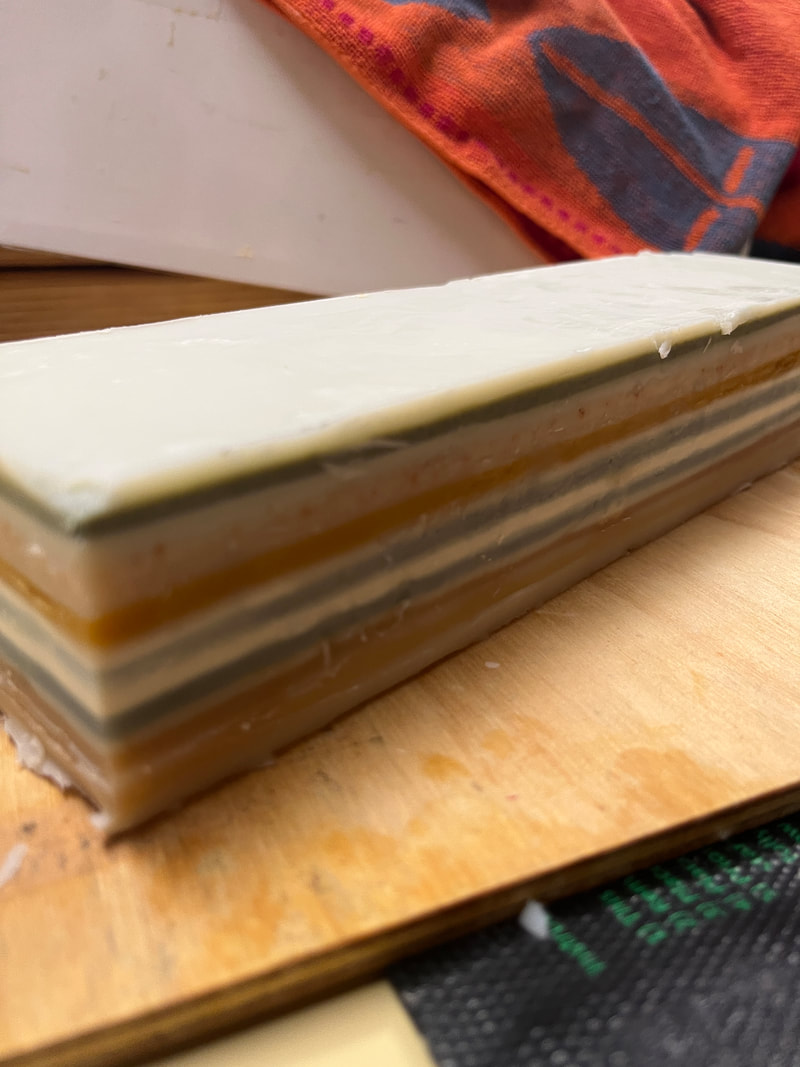 |  |
Next I poured brown around the belly, colored with cocoa powder, and added the eyes and beak - also an extruded bit of soap dough, colored with rhubarb root. I "sculpted" the top of the soap with a spatula to look like tufts of the owl ears.
 |  |  |
And the cut of these at this point.
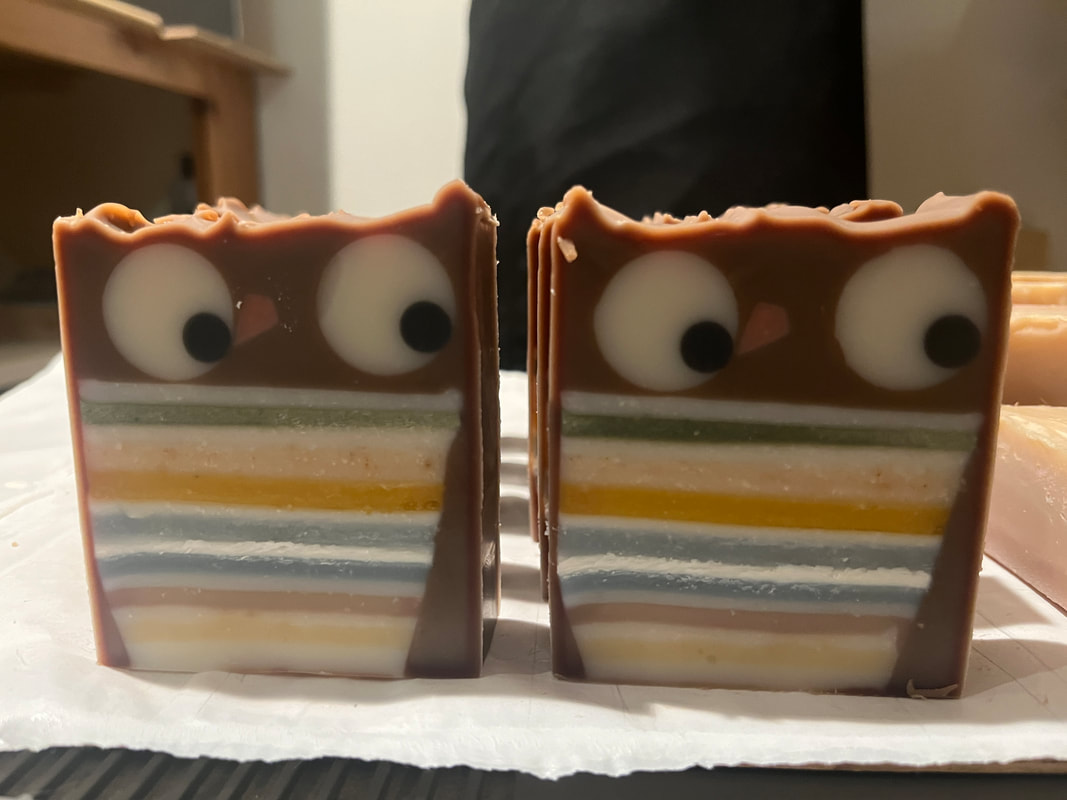
I was going to add feet on the bottom (had them extruded and everything!) but decided not to for a few different reasons. For one, once I cut this loaf into bars, I was pretty happy with the results as they were - stripes are certainly not perfect, but they are so darn adorable! Also, the bars were already quite a good size - the eyes were bigger than I had initially planned them to be, due to the size of the column mold I used, which made the dimensions off a bit. And, eliminating the feet increased the proportion of stripes in the design, which I was concerned about.
So, these are the final owl soaps.
So, these are the final owl soaps.
All kinds of distractions this week with a wedding and family in town, a death in the family, and more that just keeps piling up. I'm glad I did the owls right away, or I would not be participating this month.
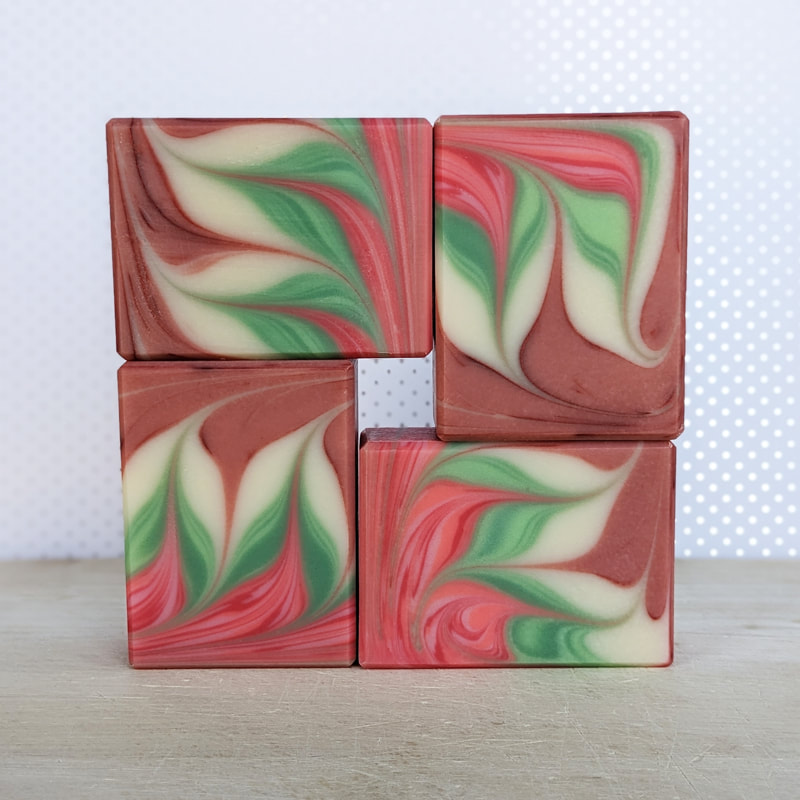
However, I did get this one poured. Although I have yet to achieve true Christmas reds and greens, there are so many other shades that are marketed these days during the holidays, and I was hoping I could come up with a design that would work well.
I found this image that I thought would lend well to this technique, so decided to make some Christmas trees.
I found this image that I thought would lend well to this technique, so decided to make some Christmas trees.

www.dreamstime.com
I poured a mold of layers, ranging from 1.5 oz. of oils to 4 oz. of oils per layer, using indigo & annatto for dark green, rhubarb root for red, nettle for a lighter green, and indigo for blue.
For those that struggle with achieving these colors with natural ingredients, I would certainly suggest Jo Haslauer's ebooks on natural colorants. I have yet to go into the realm of the alcohol extraction process she used in the last book I bought, however, that will be forthcoming, as she is able to produce some very vibrant colors.
With that being said, the combination of indigo and annatto is a green that I've found to hold up well over time. The trick is to find the right combination for the shade of green you want - and it's not going to be a bright grass green. I found a new appreciation for the rhubarb root during one of the challenges earlier this year, and so far it has not faded on me. Indigo is also a steadfast color in my experience.
I scented these bars with a combination of eucalyptus, sage, juniper berry and fir.
Here is the end of the loaf I made.
I then cut a triangle out of the center. This way I am able to make both a positive and negative image of the tree, making it a double batch with the same pour.
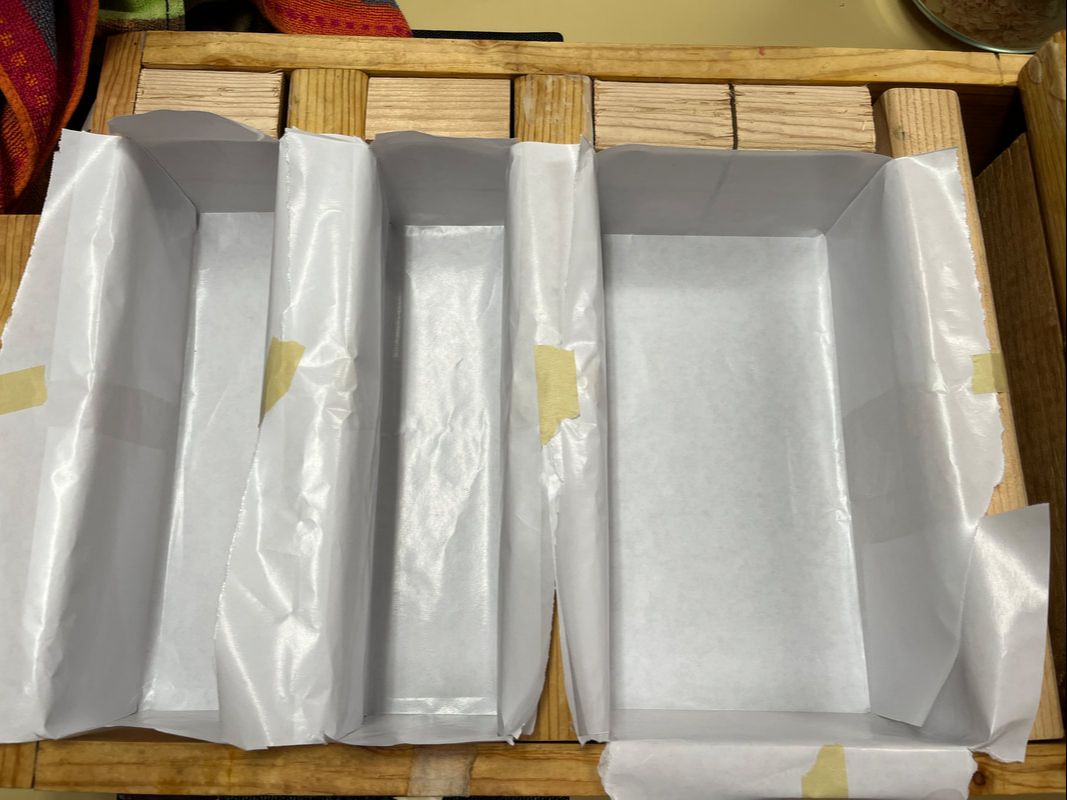
Interestingly, I did not take pictures of my cutting of the loaf, placing it in the mold or pouring the gradient. But, here is the mold I used (yes, very old school...but extremely modular and versatile), the batters for the gradient and the top before I swirled with a chopstick. Notice how the gray indigo turns into this lovely blue!
Interestingly, I did not take pictures of my cutting of the loaf, placing it in the mold or pouring the gradient. But, here is the mold I used (yes, very old school...but extremely modular and versatile), the batters for the gradient and the top before I swirled with a chopstick. Notice how the gray indigo turns into this lovely blue!
 |  |  |
For the background, I decided to do a gradient from white to a darker blue. With the striped tree, I was hoping for the look of going from snowy ground to dark sky. However, the pouring of the gradient was awkward, so it ended up being a more vertical than horizontal.
Here's the cut.
Here's the cut.
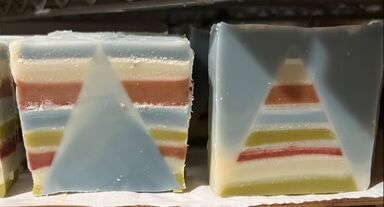
So, not exactly what I was hoping for, definitely not getting a Christmas vibe - more like mountains and maybe pyramids? Part of it is certainly the colors, but I also feel that the tree should have been narrower, and maybe another Christmas element (like a star on the striped tree, or red balls on the blue tree) would bring it together.
These soaps are still being constructed...so the story is not yet finished.
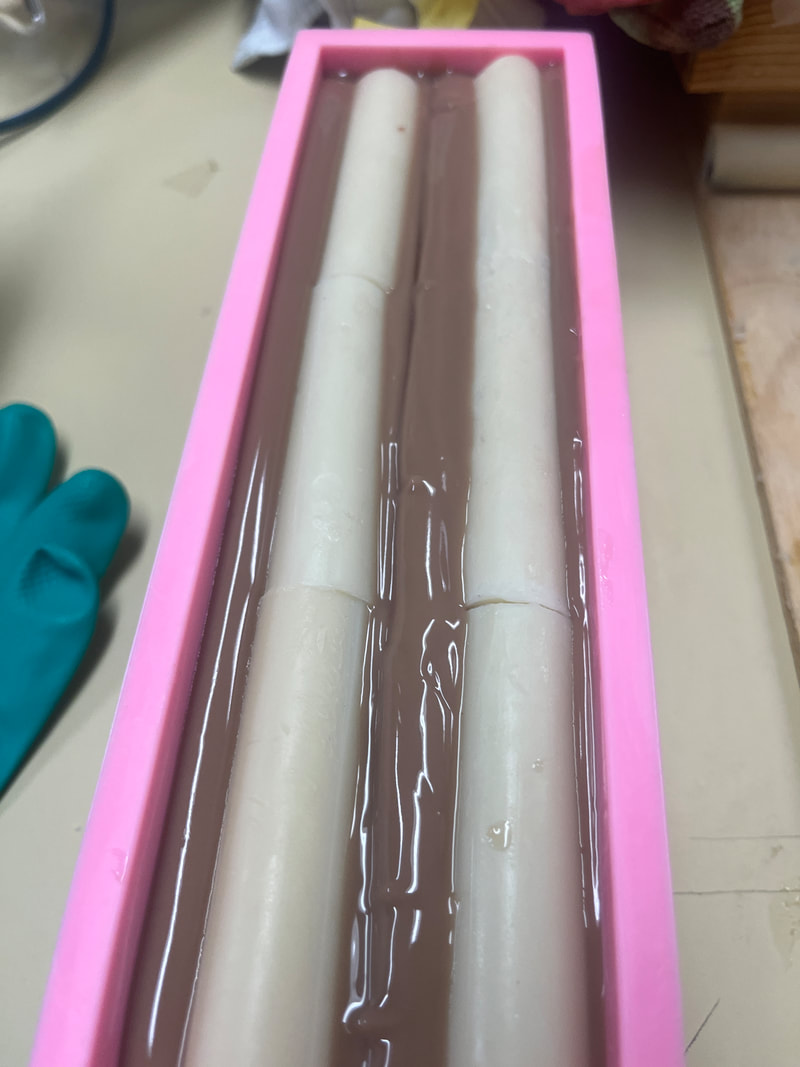
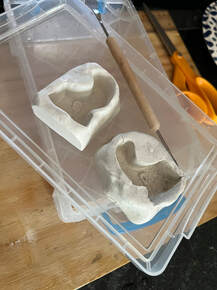
Another soap utilizing the straight layer technique, is once again a fall variety. How can you not think Halloween with stripes??? So, I decided to make witches legs. Although it seems as though this would be easier, it ended up taking a lot of time, as I needed to make witches shoes. I had the perfect shape and sized shoe, but the mold I had only had one, and for my design idea I would need 20 shoes to make ten bars of soap.
So, after spending three days, making a total of three shoes, I decided to create two molds so I can do this again in the future and so I can make all the shoes in one pouring. Also, I had the advantage of being able to make the mold in such a way as to have shoes that are left and right footed :) I took one of the three shoes, made an imprint into some clay, flipped it over to imprint the other direction into another piece of clay, and carved out a buckle on this second shoe, not the best, but good enough for this application.
I then poured plaster of paris into these molds, and unlike soaps, they were ready to pop out in about an hour, even sooner when I placed them close to the dehumidifier! I made five sets of shoes. Then I stuck these into a plastic box with hot glue and poured silicone over them. I do sometimes have an issue with the parts floating up before the silicone is set. If anyone has a solution to this problem, I'd love to hear it :) This issue was minimal this time, and I was able to make two of these molds, for a total of ten pairs of shoes.
 | 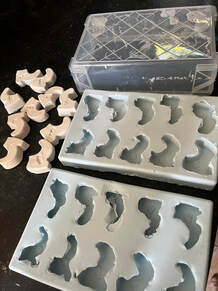 |
After cleaning up the molds and trimming away the excess, I was able to pour soap batter into them. Here are my shoes all made.
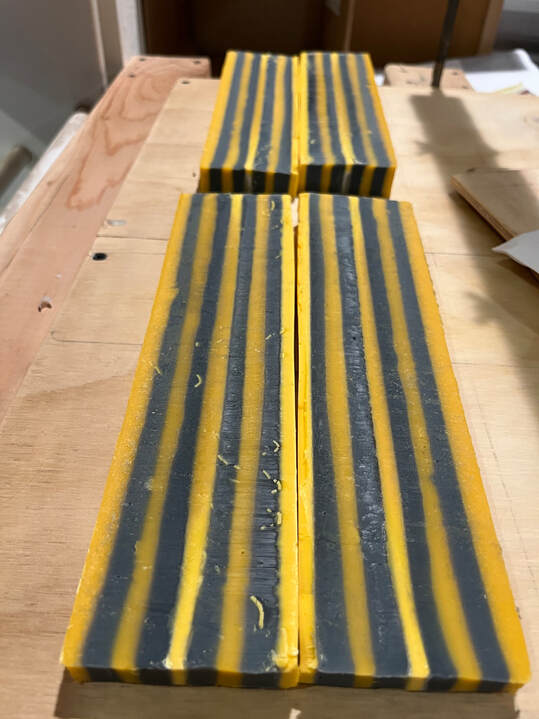
I made the witches legs by pouring straight layers of alternating black and orange. This soap is scented with a combination of orange, cinnamon, clary sage and juniper berry - a very nice fall combination.
I then cut this loaf into four tall, skinny pieces. I was most concerned about getting two that were the exact size I wanted - I again drew this up on a soap sized piece of paper - but I ended up with decent side pieces as well, so they will also end up as soaps, so as not to waste any.
Making the actual finished soap, I started with a black layer on the bottom that I sculpted to look like the edge of a witches skirt. Once it set up a bit, the legs were placed. I then poured a gradient from green to purple, piping green around the ankles to hold the shoes prior to pouring the last of the gradient.
Here's the cut of these soaps.
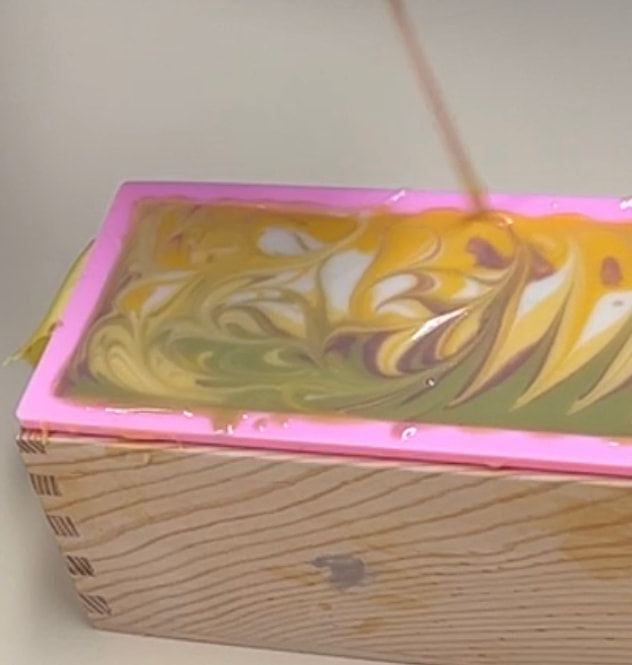
It's been a few months since I have participated in one of Amy Warden's Soap Challenges, and my current peach obsession propelled me to enter this month.
The current challenge is to create a Luna Swirl, which I did try earlier this year with some success. I did not use high contrasting colors before, so this time around, although two of the colors are very similar, the others do contrast nicely. So, we will see what we can make :)
The guest teacher this month is Christina Greenwood of Luna and the Leaf, and her Luna Swirl soaps are absolutely gorgeous! Here are the examples from the tutorial.
 |  |
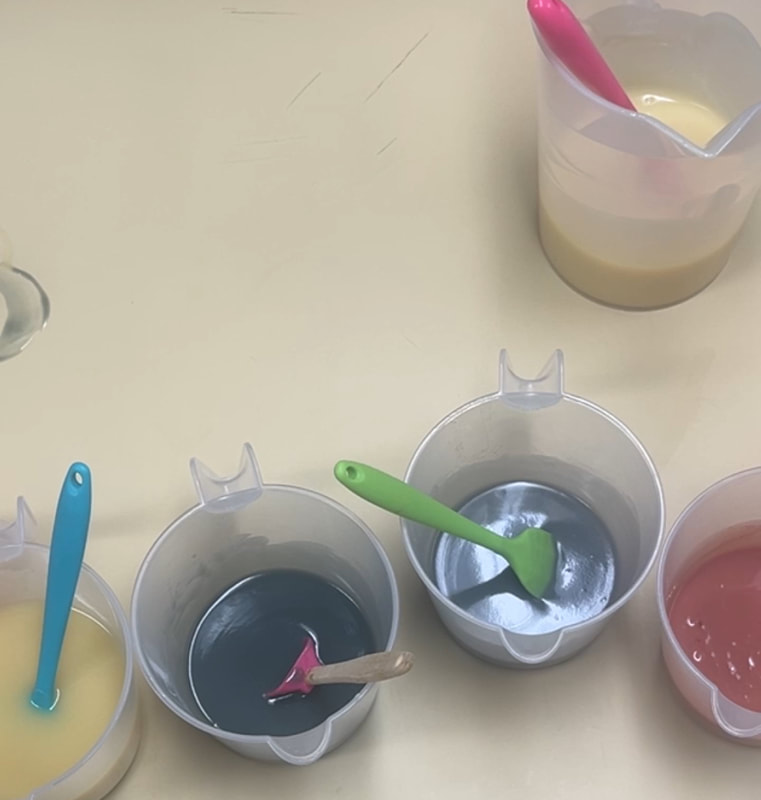
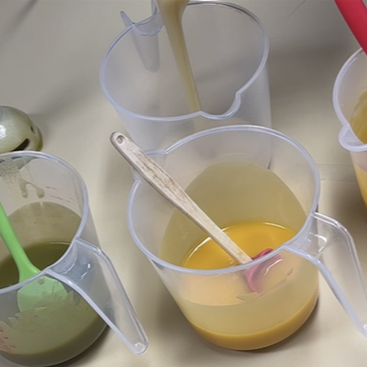
Thinking peach for this entire process, I used oils infused with rhubarb, annatto and a lighter annatto that was mixed with natural soap batter. For more of a white, I added some kaolin clay to the natural. I scented the soap with Ginger Peach fragrance, with the addition of a few essential oils to ground it. Here you can see my batters all ready to go - although the rhubarb is out of the shot...when you scroll down through the process, there are pictures of that color :)
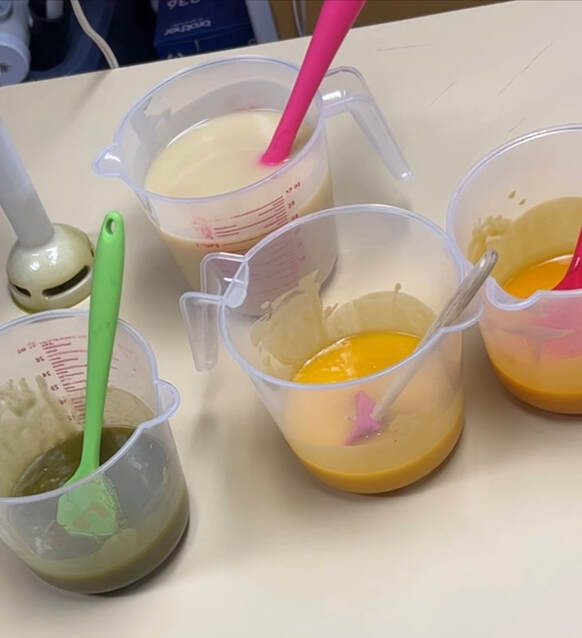
I poured one third of the white into a separate pouring container to help me manage the amount of white to incorporate into each gradient. I also set aside a few tablespoons of each color to use on the top.
I started with the rhubarb, so you can see the color that makes here in these photos. The filming angle is not ideal, so I've included a picture of the gradient once it was poured. The rhubarb does make such a lovely shade!
 |  |  |
Next I poured the orange-white gradient.
And finally, the yellow/light orange gradient. It's hard to see the difference between the two shades of orange, and if I were to do it again, maybe I would do a larger portion in green? I really like the visual appeal of the green, orange and burgundy colors together. It would also help if I didn't move the mold out of the camera's field of vision :)
I then added stripes of each individual color on the top, including introducing a bit of the green, prior to performing the hanger swirl. I created my own swirl pattern in which I came in through the green to the center of the mold, then did several clockwise spirals, increasing the circumference of the motion, from the center out and then up the side where the red was. I gave it a few more swirls for good measure, but wanted to see if I could produce a circular effect, to create an impression of the roundness of a peach.
I added the remaining soap batter to the top and gave it an elegant swirl. These pictures show the different shades of orange a little better.
 |  |  |
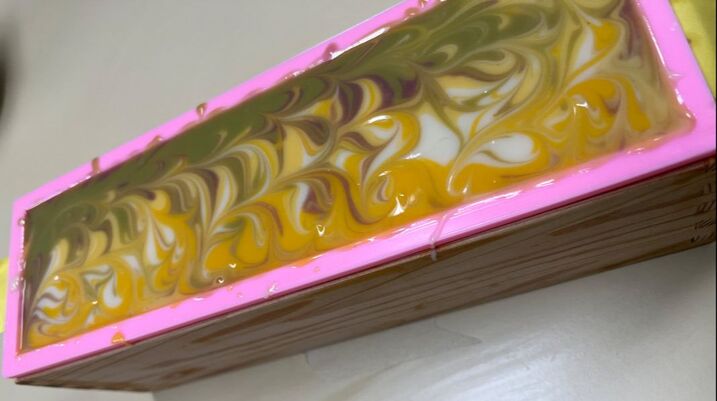
I do love the morning cuts! I was so excited to get into this one to see how it turned out.
Two things could be improved upon.
1) The contrast between colors. I feel there's not enough distinction between the two oranges, and my white isn't super white. Next time I'll try brine to bring the white out more, although I'm not sure how that will affect the fluidity of the batter, and that is certainly important with this one.
2) The swirl pattern did not give as much movement as I had hoped for. I'll have to experiment more with some of the patterns that Christina had suggested.
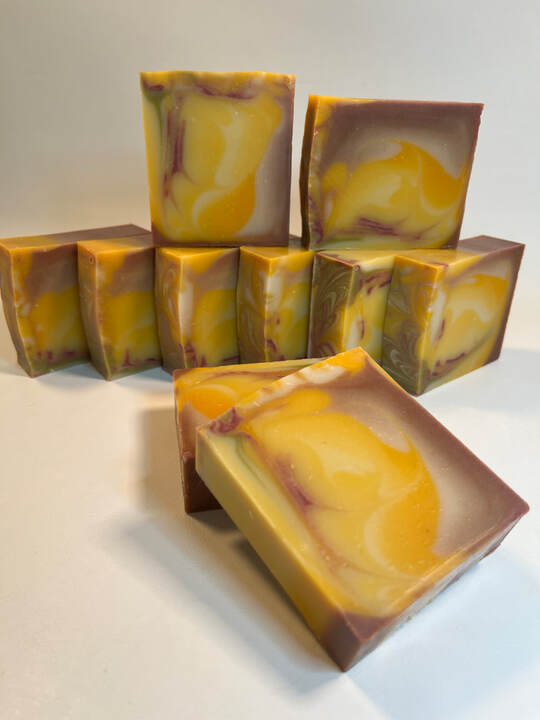
What a lovely bar!
I really enjoyed this process, and I will certainly be doing this again!
Thank you Christina for creating this beautiful technique!!!
And, Thank You Amy for bringing the whole world of soapers together to collaborate and experiment :).
I'm pleased you made it to the end!
Please leave a comment below!!!
Taralyn
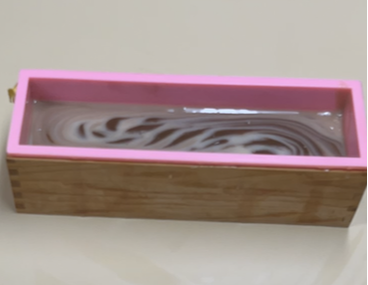
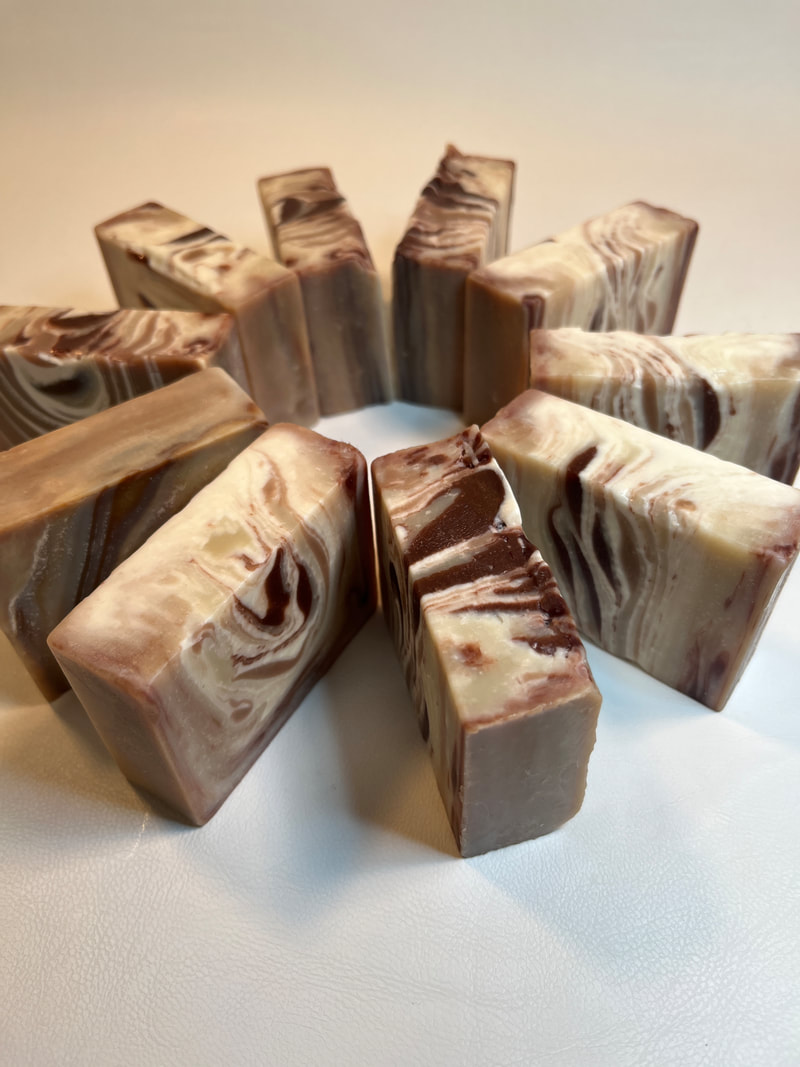
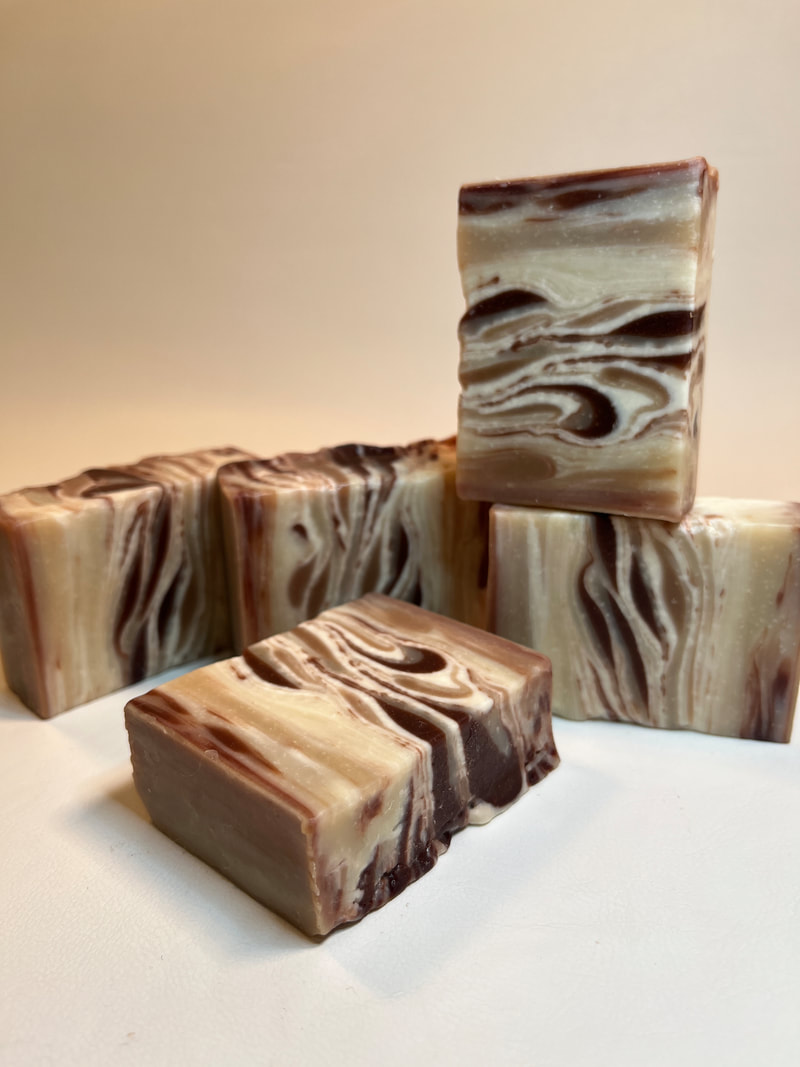
This month we are revisiting the Circling Taiwan Swirl, once again following along with Amy Warden's Soap Challenge. Pictures of the soaps made by Amy in the tutorial are shown here below.
 |  |
The general idea to get these beautiful swirls is to pour separate sections of color, easiest done using dividers, and then first swirling the soap back and forth across the short distance of the loaf mold, following with a swirl touching the edges of the mold in a circular motion until you are satisfied with the design. The true beauty is not revealed until the cut, which is performed horizontally rather than vertically. I've used this technique in the past, and this month I decided to experiment with a couple of the elements to see what the resulting effects are.
One of these elements is trying to obtain a lighter white naturally. Since I do not use titanium dioxide in my soaps, I have difficulty in successfully creating the contrasts that a pure white would provide. There are a few ways to achieve this, but what I wanted to try this month is the use of a brine solution, as seen on Auntie Clara's blog. I've made salt bars in the past, where I add the salt at trace, however, I've never created a briny lye mixture. I'm hoping this will help produce the contrast I am looking for.
Another element I took to nearly an extreme was the circling of the swirl. In the past I've always been afraid to circle around too much, as I don't want to lose the swirl and muddy the colors. Since I was going for a cinnamon bun type of soap, I didn't feel doing it too much would create much harm, so I kept going round and round. I was going for an almost thin lines design look, and was hoping I could achieve it with this technique.
I questioned whether or not I should enter this soap into the challenge, as the result was certainly different than what I feel most of the entries will be. But, I loved the final design, so I thought I'd share it anyway.
And, the third element that I expanded upon was the number of dividers. I've only ever used two in the past, and this time I used four. Fun times!!!
So, here we go!
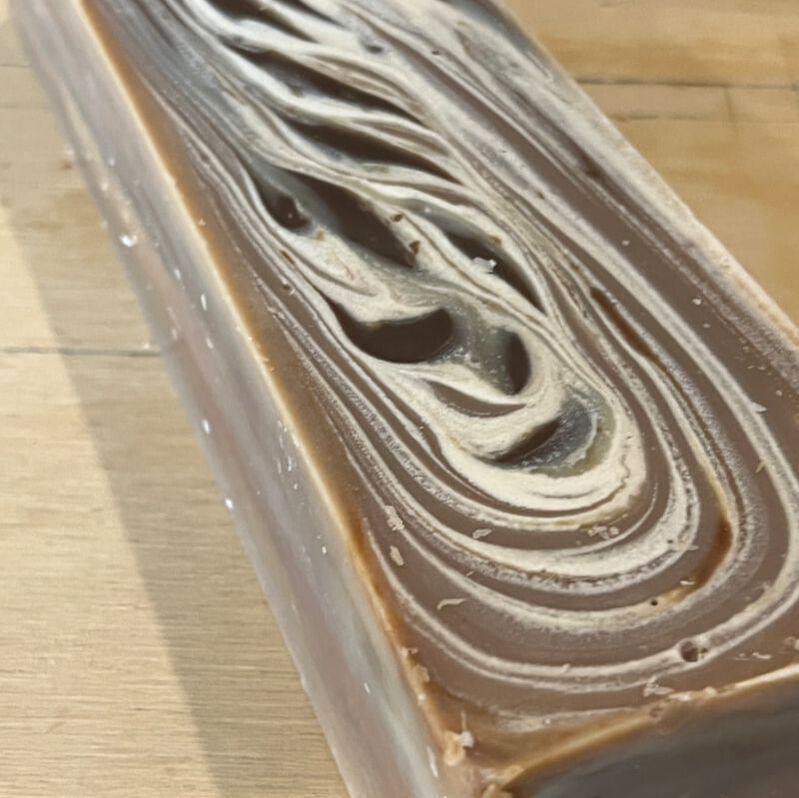
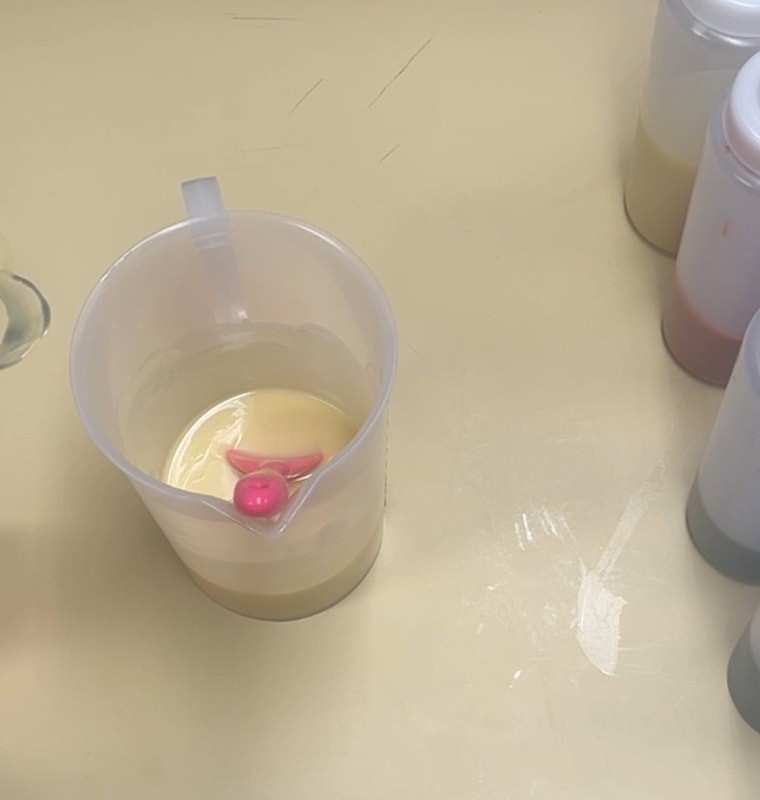
For the Cinnamon Bun, I used soap batter colored with cocoa powder, both a dark brown and a lighter tan color. I also used two portions of natural soap color and one portion made with the briny lye, to hopefully create a brighter white than I've achieved using kaolin clay. The scent is cinnamon, orange, lemon, nutmeg, cardamom and just a touch of sweet vanilla fragrance - smells so much like a cinnamon bun!
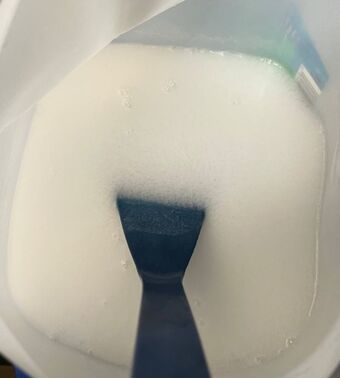
Making the lye was certainly an interesting experience. I made a 20% brine solution with distilled water and European spa salt. Once the salt had completely dissolved into the water, I added the appropriate amount of lye. It is important to perform this in this order as the salt will not dissolve into a lye solution. Once the lye was added, the solution turned from a clear salt water solution to a cloudy salt and lye solution.
The salt in the water turns into a very fine particulate, and the solution needs to be kept stirred up for it to be used properly in the recipe. The salt will settle to the bottom of the container if left to sit. And, another interesting fact is that the soap batter made with this briny lye does not look any different than the natural colored soap batter. So, you do not see the design properly until after it is set up.
For the Cinnamon Bun, I used soap batter colored with cocoa powder, both a dark brown and a lighter tan color. I also used two portions of natural soap color and one portion made with the briny lye, to hopefully create a brighter white than I've achieved using kaolin clay. The scent is cinnamon, orange, lemon, nutmeg, cardamom and just a touch of sweet vanilla fragrance - smells so much like a cinnamon bun!
Making the lye was certainly an interesting experience. I made a 20% brine solution with distilled water and European spa salt. Once the salt had completely dissolved into the water, I added the appropriate amount of lye. It is important to perform this in this order as the salt will not dissolve into a lye solution. Once the lye was added, the solution turned from a clear salt water solution to a cloudy salt and lye solution.
The salt in the water turns into a very fine particulate, and the solution needs to be kept stirred up for it to be used properly in the recipe. The salt will settle to the bottom of the container if left to sit. And, another interesting fact is that the soap batter made with this briny lye does not look any different than the natural colored soap batter. So, you do not see the design properly until after it is set up.
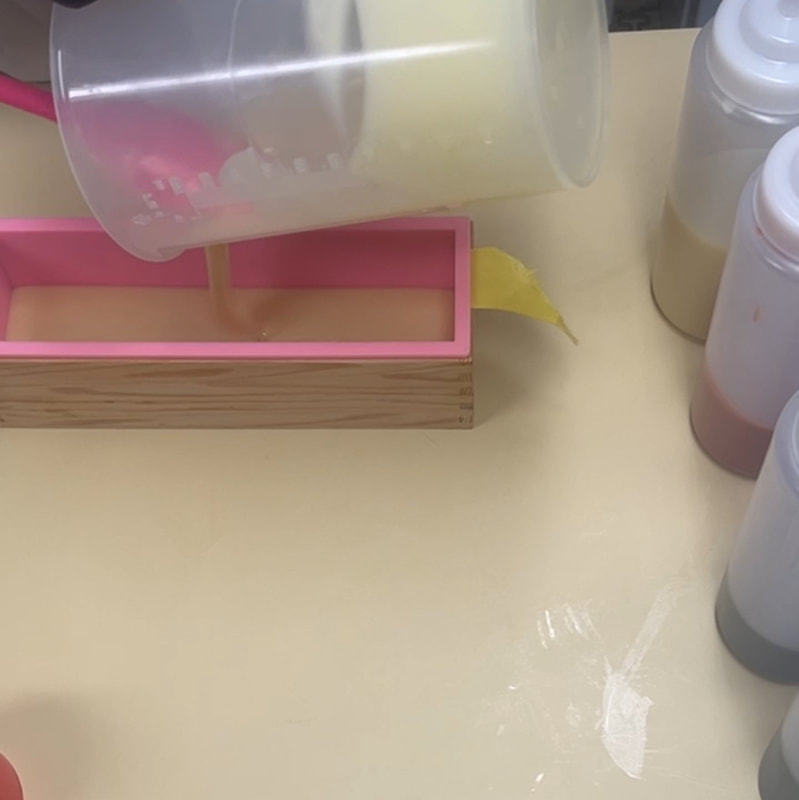
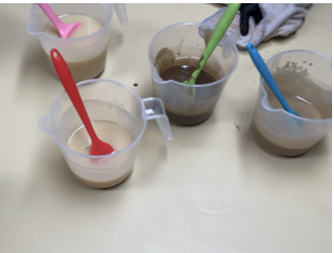
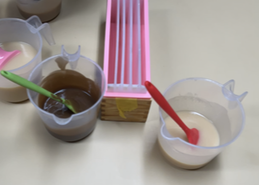
Here are some process photos of making the Circling Taiwan Swirl with the four dividers - five distinct sections prior to the swirling.
 |  |  |
 |  |  |
 |  | 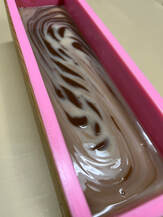 |
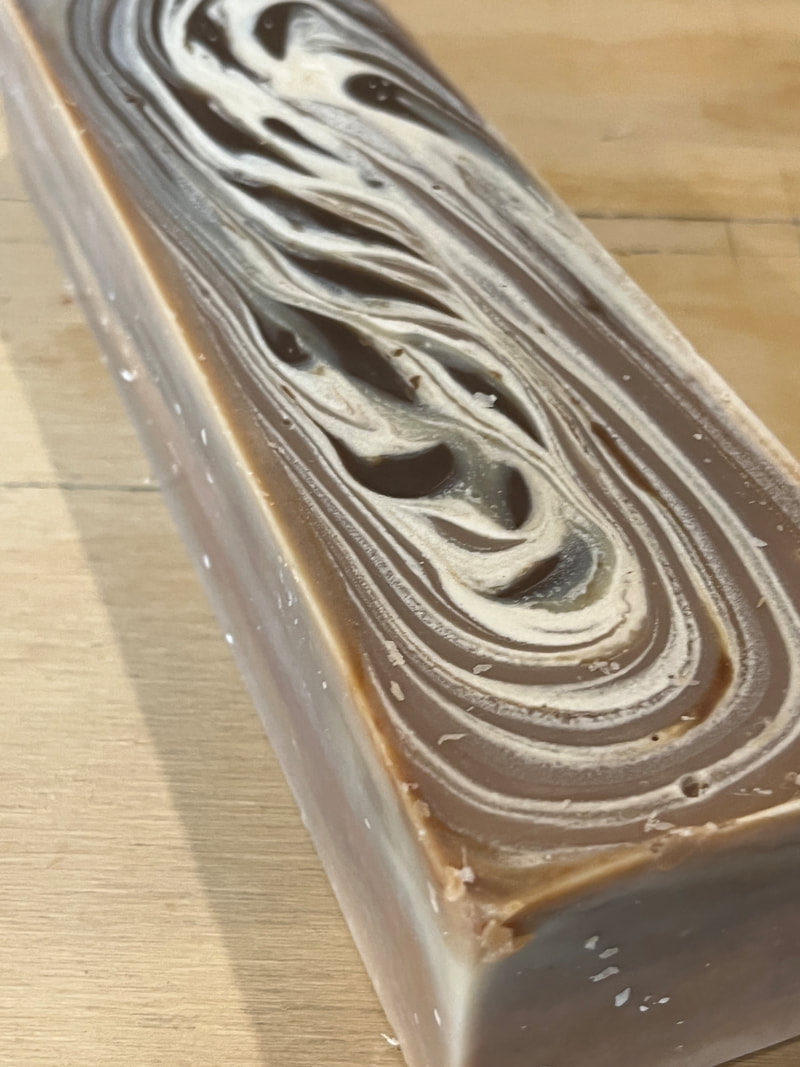
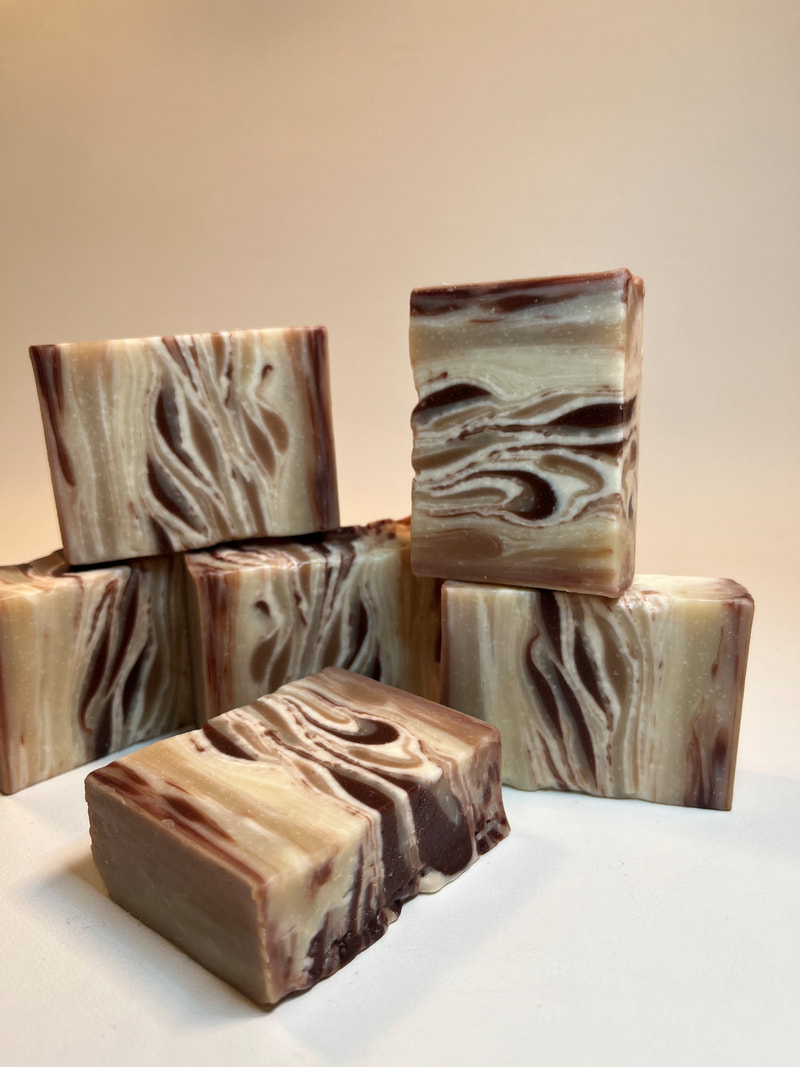
The one thing that I really need to remember is to add the cocoa to the oils prior to adding the lye, instead of adding at trace. I did not do that with this batch, and the dark brown got a bit thick on me. I do think that it worked in my favor this time, as the shape of the blobs turned out very much like a cinnamon bun, but the swirls possibly could have turned out better if all of the batter was the same consistency.
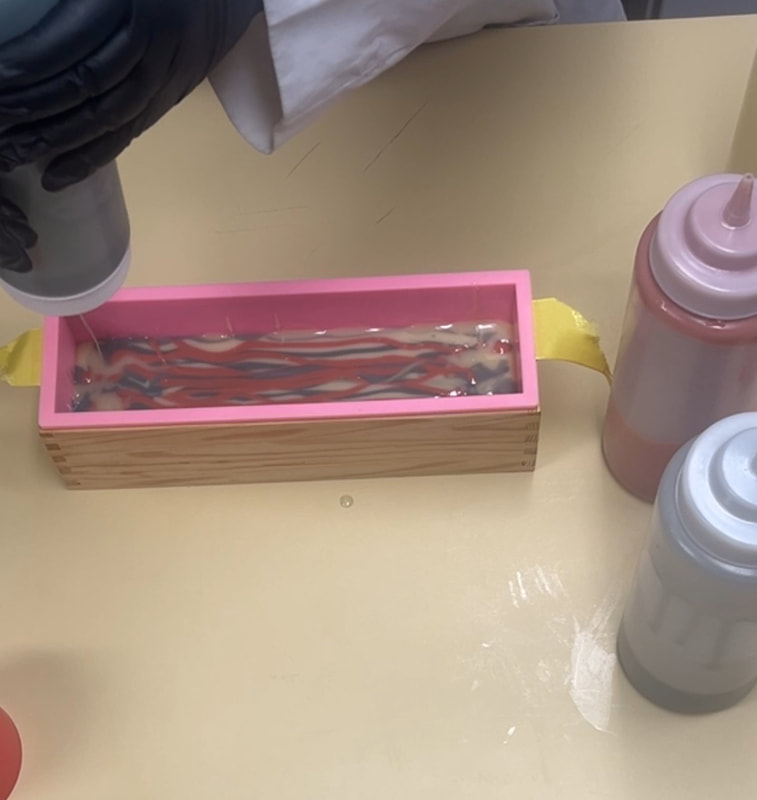
And, here are images of the solid soaps after sitting overnight.
And, here are images of the solid soaps after sitting overnight.
 |  |
 |  |
The other thing I should have thought of and didn't was the fact that the addition of the salt could be problematic at cutting. Generally, with the full on salt bars, I will cut them a couple of hours after the pour - and sometimes they would still be a bit crumbly around the edges (it's a fine balance between being too soggy and too crumbly, really...). This batch had a little of that going on, and I cut them about 12 hours after the pour. Maybe I should have cut sooner, but since the majority of the soap was not made with the briny lye, I'm really not sure which way is best.
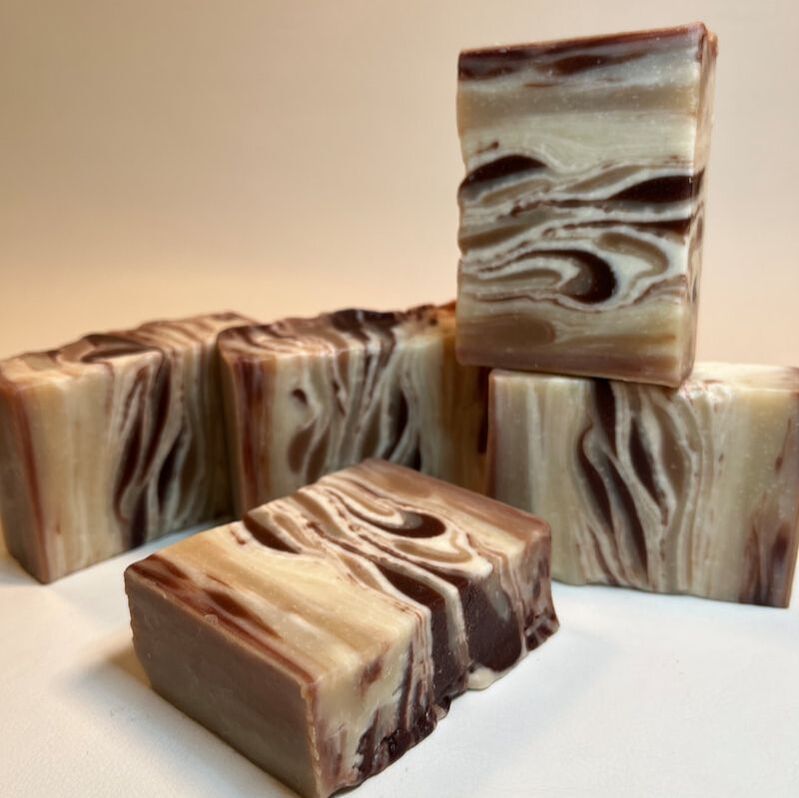
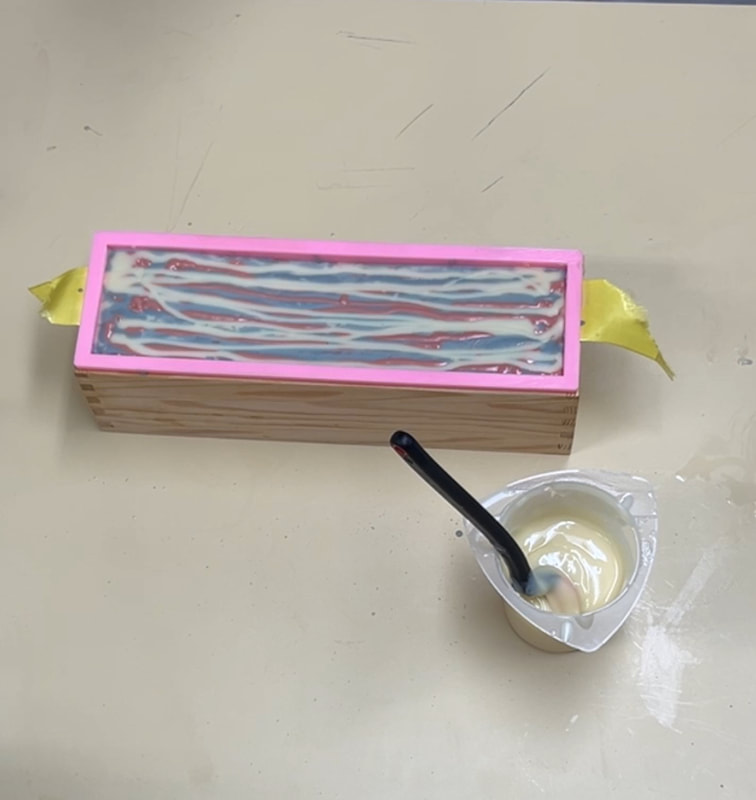
Anyway, look at that white! It certainly proved to be a successful method for creating a natural white. I really love the way these bars turned out, and they are perfect as a Cinnamon Bun bar!
Anyway, look at that white! It certainly proved to be a successful method for creating a natural white. I really love the way these bars turned out, and they are perfect as a Cinnamon Bun bar!
Thanks for reading through to the end!
Taralyn
This month I've been gearing up for Easter - I'm so ready for Spring this year!!!
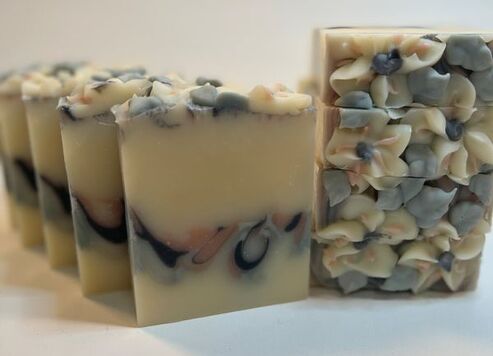
Amy Warden's Soap Challenge Club is doing a month on texturing the top of your soap, either purely with texture and botanicals (which I love the look of!) or with piping the top as you would with frosting. The guest instructor this month is Whitney Schneider of Cheeky Goat Soapery, and here you can see the beautiful examples given for the tutorial.
Amy Warden's Soap Challenge Club is doing a month on texturing the top of your soap, either purely with texture and botanicals (which I love the look of!) or with piping the top as you would with frosting. The guest instructor this month is Whitney Schneider of Cheeky Goat Soapery, and here you can see the beautiful examples given for the tutorial.
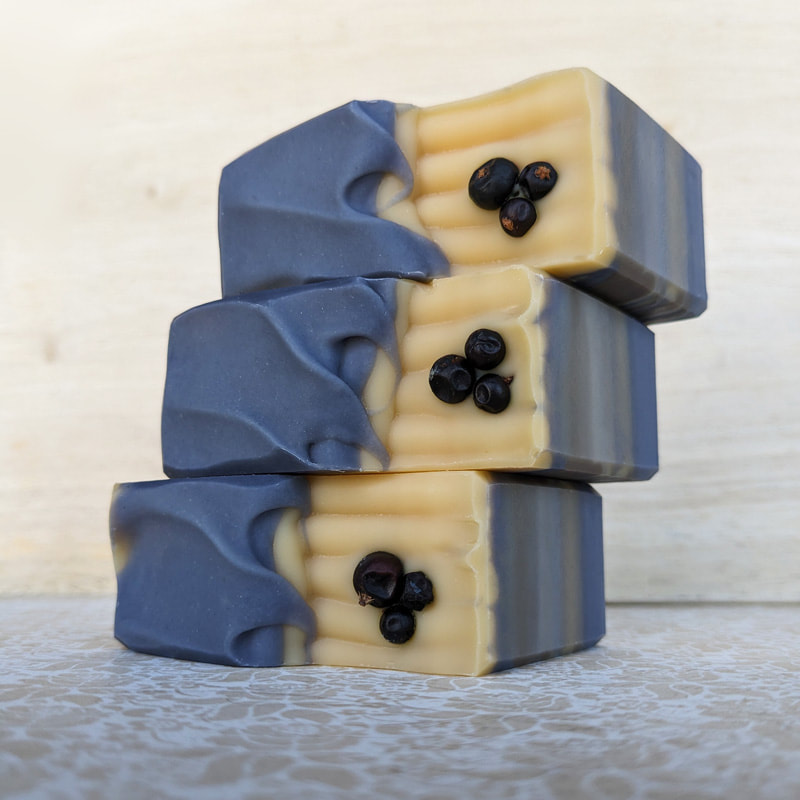 Amy's Textured Top Soaps |  Whitney's Piped Top Soap |
It's been a while since I've piped some soap, and lots of ideas have been kicking around in my head, so piping it is for me!
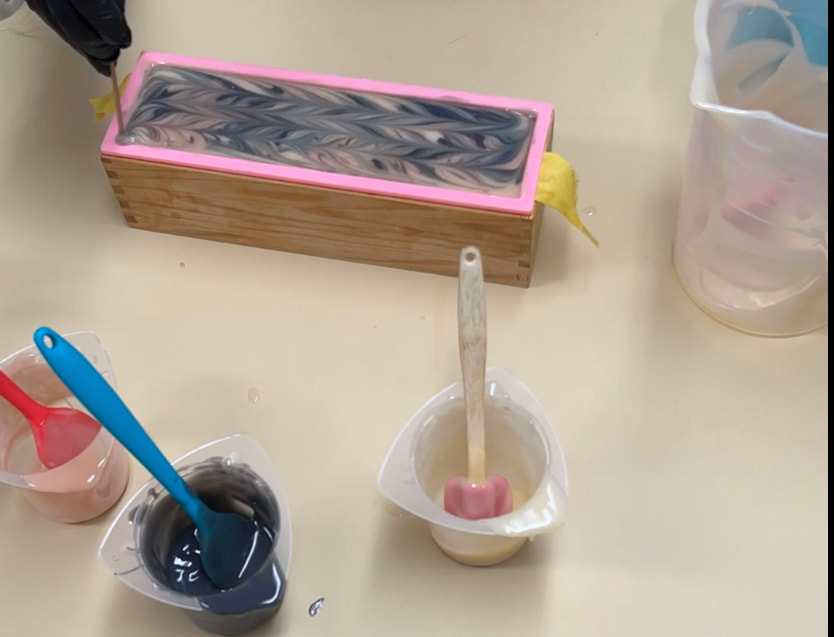
I started off with making some flowers for the top. I've found it's easier to have them made ahead of time so I'm not fighting so much with batter on the top of the loaf, just my preference, makes my day easier. And, I also know whether or not I'm happy with what I've made before committing to the whole loaf :)
So, I made some white flowers, added a bit of pink to the petals and black to the center.
So, I made some white flowers, added a bit of pink to the petals and black to the center.

I then moved onto the main loaf of soap.
It's mostly a natural colored batter, with a section of mini drop swirl about 1/3 of the way up the bar, created with colors also used on the top of the loaf. So, natural, pink (rose clay), black (bamboo charcoal) and green (annatto/indigo). For the green this time, I played with the annatto/indigo ratio, trying to achieve a lighter, more springy color. It actually turned out a bit more blue than I wanted, but the effect is very nice in the final soap design. I scented the bars with a combination of Calla Lily and Hydrangea, beautifully sweet!
Here is a link to the video of the pour on Instagram, if you like videos :)
 |  |  |
 |  |
I then placed the pre-made, piped flowers into the wet batter, taking into account where the bars would be cut to hopefully make each one with a decent bit of flower.
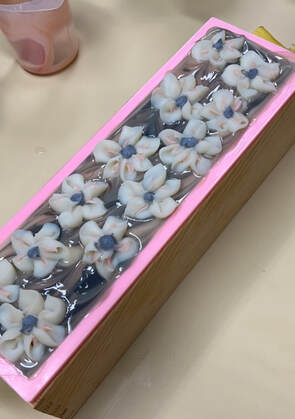
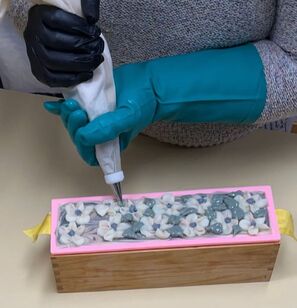
To finish it off, I piped fresh green leaves around the flowers to fill in most of the gaps and to further hold the flowers onto the top of the soap.
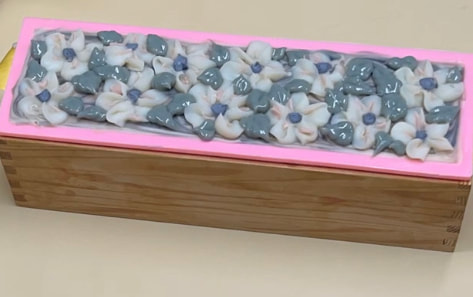
And here is the top of the loaf while wet.
And the cut bars...I do love how these turned out - and they smell divine!
Thank you for reading to the end :)
Come back again soon to read more soap making stories!
Taralyn
Come back again soon to read more soap making stories!
Taralyn
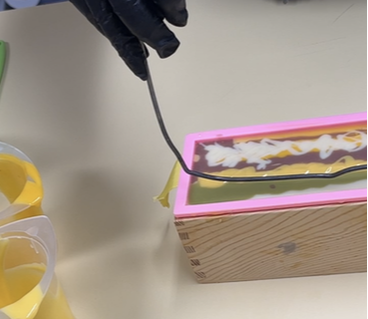
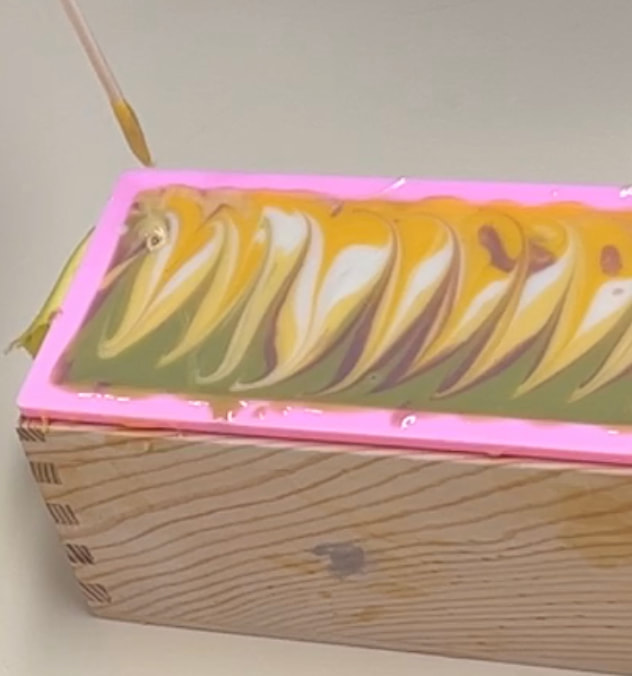
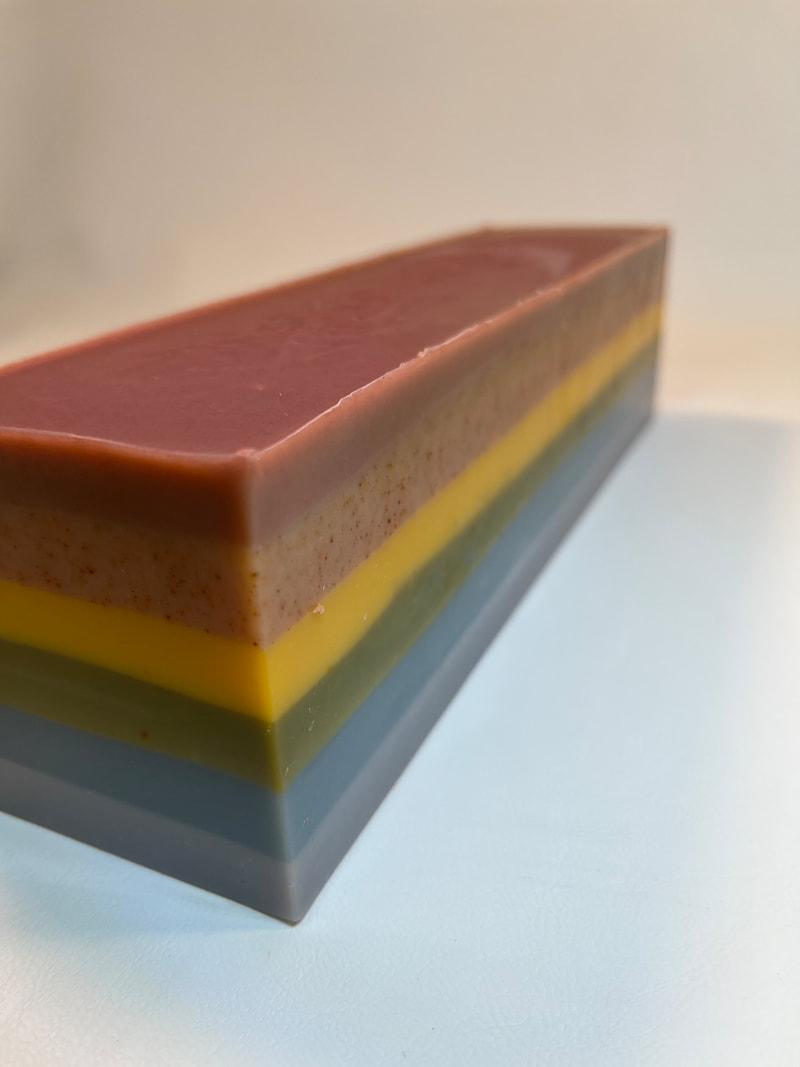
This month I made these fun soaps that are perfect for St. Patrick's Day themed decor. They will be entered into Amy Warden's Soap Challenge for this month, which is all about using natural colorants in soap making. The guest teacher was Kandra Churchwell.
Since natural colorants is how we always roll here, I just had to make some artisan soap, and the upcoming holiday gave me a good excuse to use nearly my entire color palette - in addition to encouraging me to try a couple new ideas.
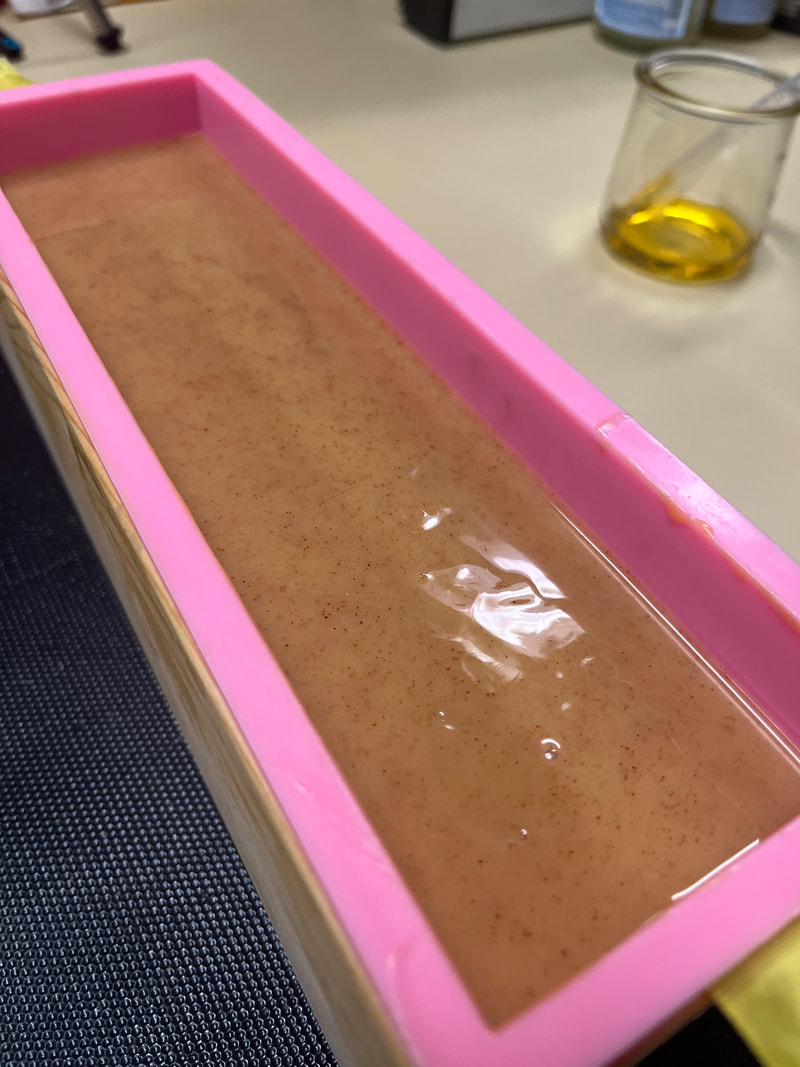
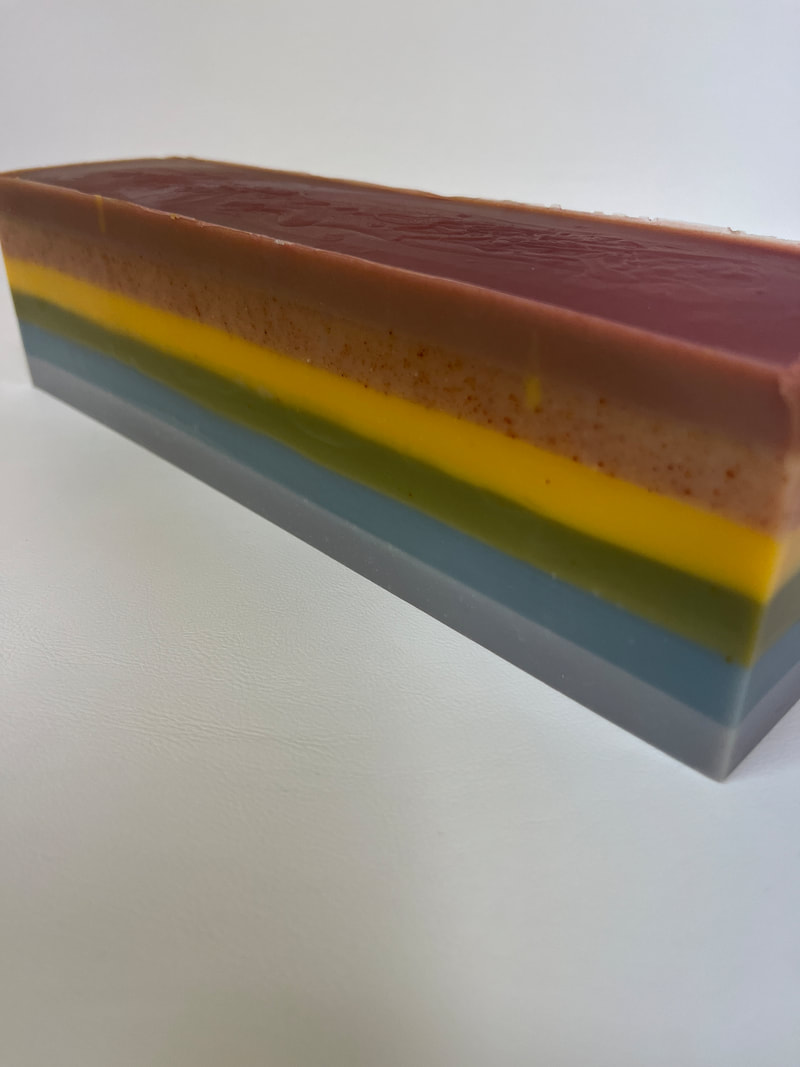
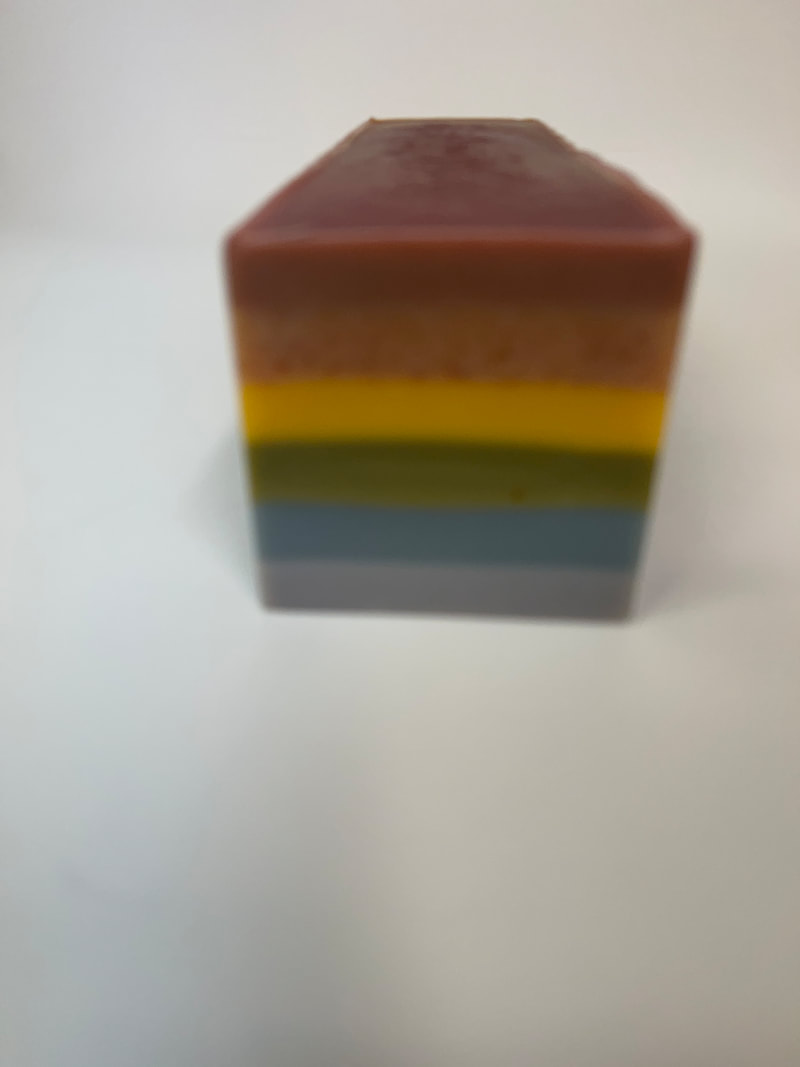
The design idea was to have a pot of gold with a rainbow behind it. So, I had to make this soap in two steps. First I started with a rainbow, which I made with a six layered soap square. I flipped it for the final soap, so it went up vertically from the pot of gold. These bars are scented with a combination of Rosemary, Grapefruit and Mint.
The colors were obtained as such:
Since natural colorants is how we always roll here, I just had to make some artisan soap, and the upcoming holiday gave me a good excuse to use nearly my entire color palette - in addition to encouraging me to try a couple new ideas.
The design idea was to have a pot of gold with a rainbow behind it. So, I had to make this soap in two steps. First I started with a rainbow, which I made with a six layered soap square. I flipped it for the final soap, so it went up vertically from the pot of gold. These bars are scented with a combination of Rosemary, Grapefruit and Mint.
The colors were obtained as such:
- Purple: Alkanet infused olive oil (this was an older infusion that was a little weak, so I added a bit of indigo to darken it up a bit)
- Blue: Indigo in lye
- Green: Annatto infused olive oil and Indigo lye
- Yellow: Annatto infused olive oil
- Orange: Paprika (I wanted to do an infusion, but ended up adding at trace which gives a speckled effect - it's been a crazy month and just didn't have the time...)
- Red: Rhubarb Root - this is a new one for me, and I'm very excited about the results!
Here are process pictures of the rainbow - I forgot to take a picture of the yellow layer...
 |  |  |
 | 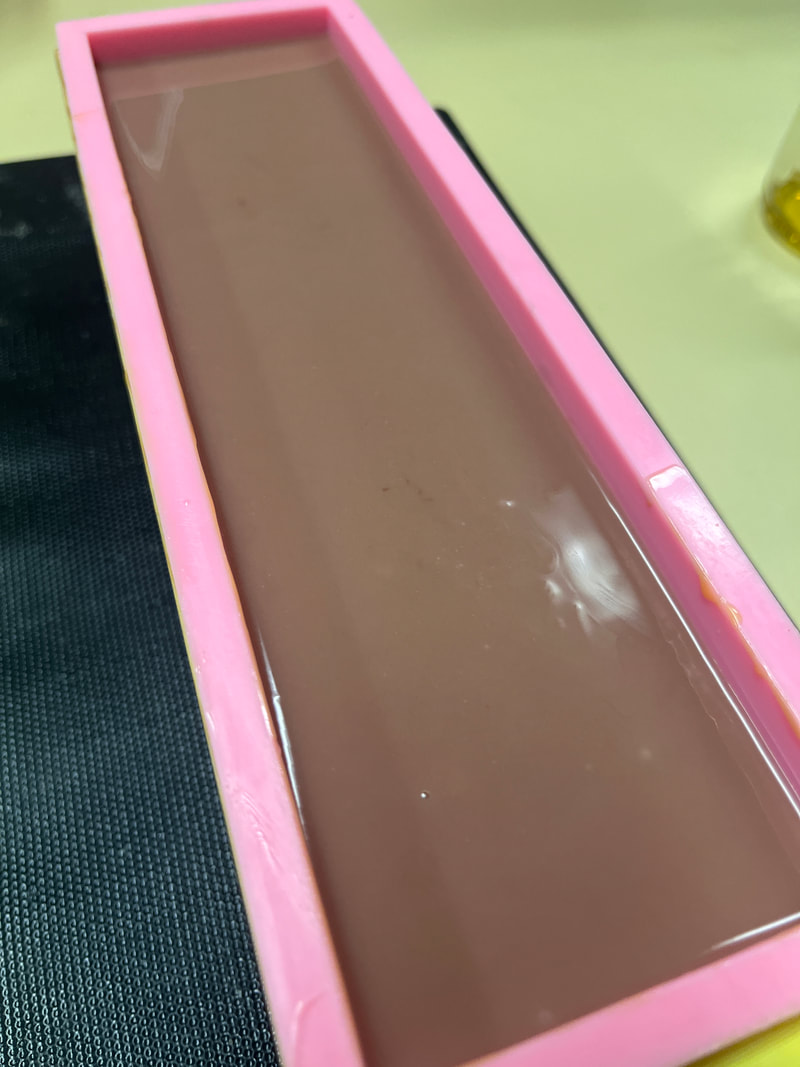 |
Such a beautiful rainbow...I think the best I've achieved to date!
 |  |  |
And, of course, I had to proceed to totally ruin it...LOL!
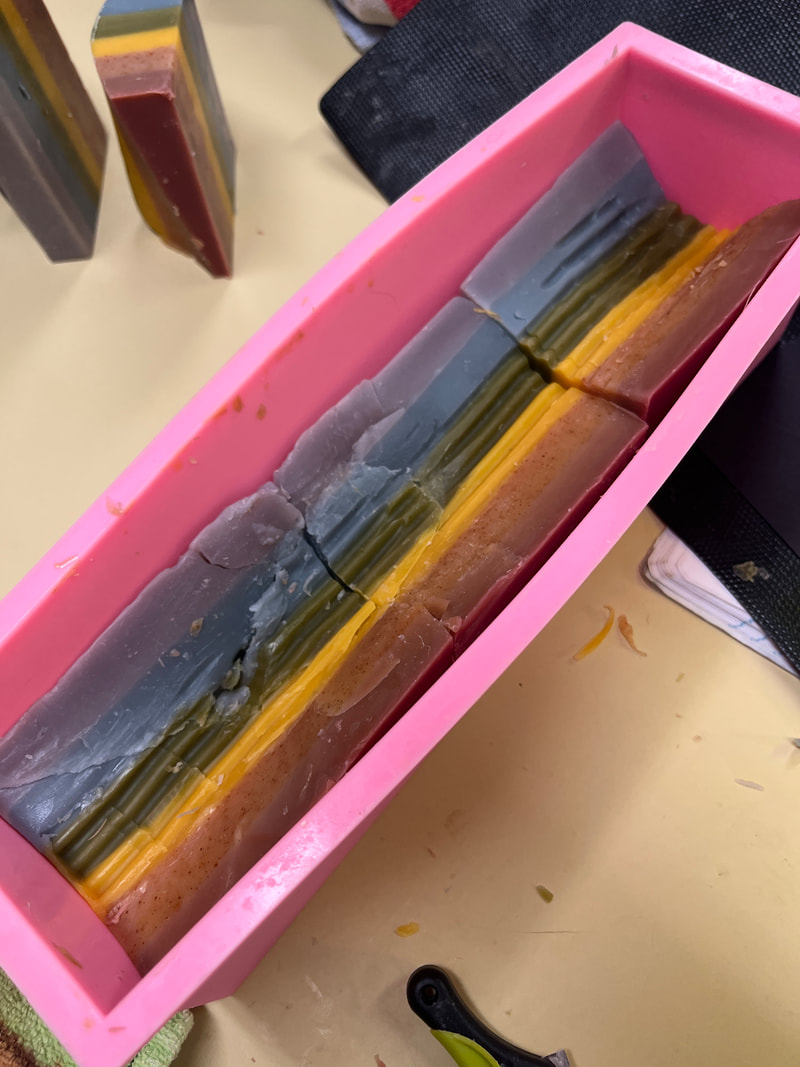 |  | 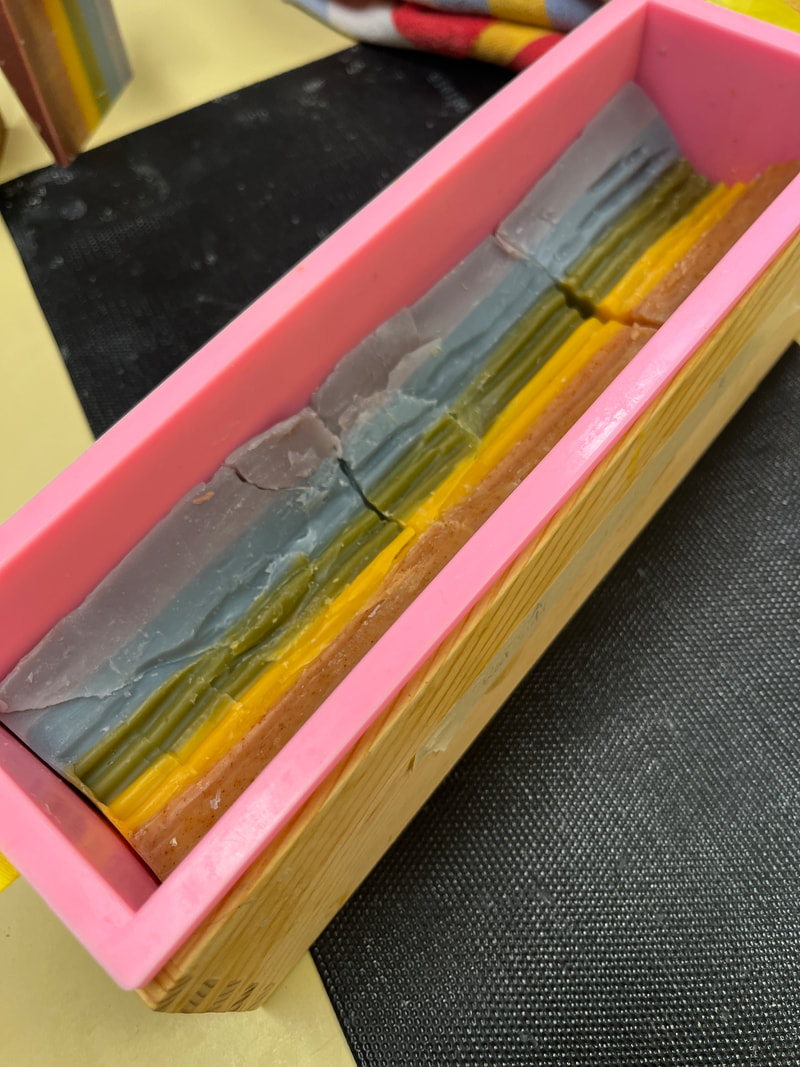 |
The plan was to cut down the loaf to achieve a semi circular, top of the pot of gold shape, which as you can see started okay on the ends. However, the blade I was using had a mind of it's own and I got the shape you see there in the middle (I also managed to cut my finger a bit - no blood thank goodness! - so not the best tool for the job!). I ended up wrenching the blade out of the soap, cutting the loaf into three more manageable sized chunks, fixing the shape to the best of my abilities and then "Frankenstein-ing" the loaf back together.
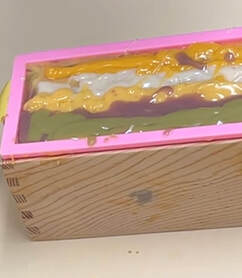
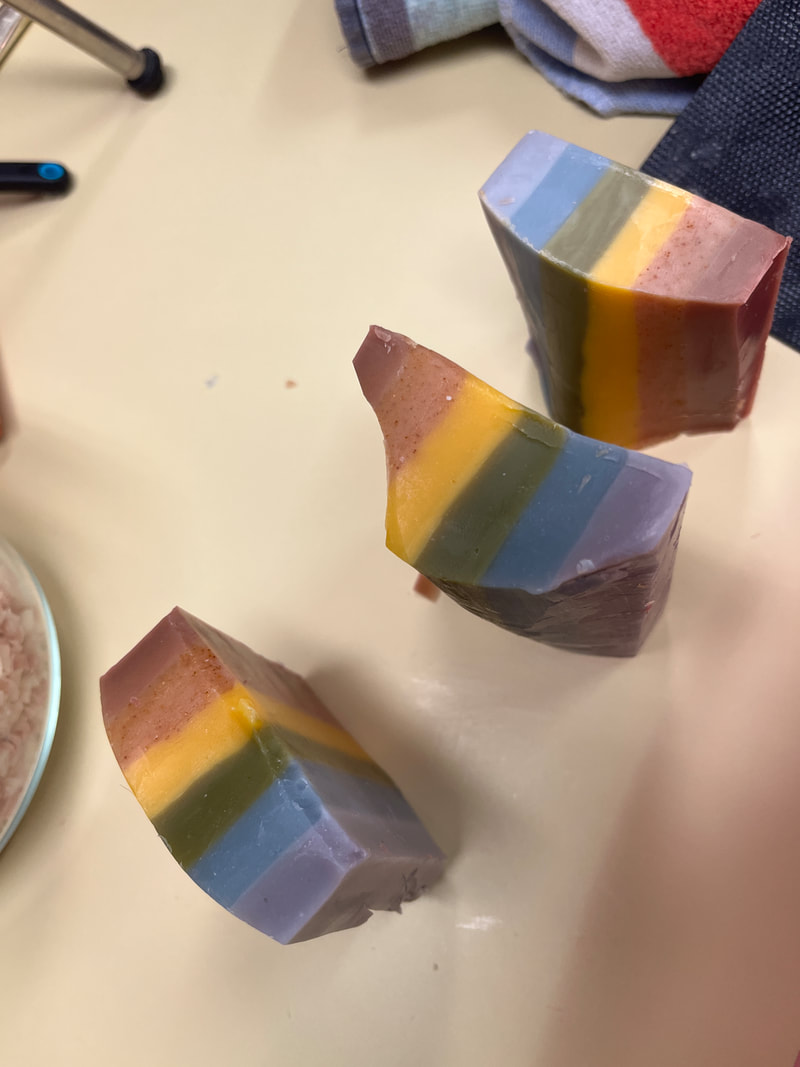
I then added some texture to the "top of the gold pile" with some carving tools before I poured the yellow (gold) layer, created with annatto seed infused olive oil and a bit of cocoa. I also forgot to take a picture of this layer...yellow, again, not sure what's up with that! Then I poured a layer of black for the pot, using bamboo charcoal for the coloring.
This is the end result. In case you are wondering about those huge cracks...I marked where they were on the side of the mold and cut that area out prior to slicing the rest of the bars. So, not as much waste as you would think. Not entirely what I had envisioned, but I do think they turned out quite nice :)
Taralyn
Colorado Artisan, making beautiful hand-crafted soaps with all natural ingredients.
Archives
August 2025
January 2025
July 2024
April 2024
September 2023
August 2023
April 2023
March 2023
February 2023
December 2022
June 2022
May 2022
April 2022
February 2022
January 2022
November 2021
June 2021
May 2021
April 2021
February 2021
November 2020
October 2020
August 2020
April 2020
March 2020
November 2019
June 2019
May 2019
March 2019
February 2019
January 2019
October 2018
September 2018
March 2018
December 2017
November 2017
October 2017
August 2017
July 2017
June 2017
April 2017
May 2016
April 2016
November 2015
Categories
Categories
Comment Policy
We follow Grandma's rule here: If you don't have something nice to say, don't say anything at all. While constructive criticism is always welcome, keep it polite, considerate and friendly. These are simple rules that, if not followed, will result in the deletion of the comment. Thank you.
 RSS Feed